Custom-Built GM Diesel Engines By Lee Swanger
Follow along as we show you a custom-built 6.5L diesel engine, and evaluate the synergistic effect on performance when combining all of "The Right Stuff" into one carefully assembled custom engine. 
For the past five years I have been promoting the cause of naturally aspirated (non-turbocharged) diesels here on TheDieselPage.com and in the bulletin board forums, and I have described the incremental steps taken to improve the performance of my 1984 6.2L Chevrolet C10. Since the last naturally aspirated story, I've been wanting to take my 6.2L to the next level of performance, but found the original engine wasn't up to the task. Why did I swap out my 6.2L engine after 11 faithful years of service? Well, I considered installing a Banks turbocharger (from a thermodynamic perspective, ALL diesel engines should be turbocharged) and have also doodled out some ways to add Nitrous Oxide to the combustion process. Before adding power, I wanted to know if my original engine was healthy enough to withstand the added stress, so I pulled the oil pan to inspect the main bearing webs on the block. Some of the early 6.2L diesels have developed main web cracks that emanate from the outer main cap bolt holes of the center three main webs. Upon close inspection, I discovered the dreaded cracks on my 6.2L block. In addition, after 150,000 miles of operation, the first 90,000 of which were NOT under my control, compression pressures were found to be below what The Diesel Depot considers minimal for a quality used engine. And, as this 1999 photo shows, I had already increased the fuel-rate in my old injection pump to the maximum. I needed a new engine, and had to make a plan. At about the same time, Jim Bigley asked if I would be interested in writing another story about the performance potential of a 6.5L naturally aspirated diesel engine. Part of this endeavor meant working with The Diesel Depot. They only had to twist my arm a little bit to get me to agree, with great enthusiasm, I might add. Planning for the New Engine In consultation with the owner/managers of The Diesel Depot, we decided to stay with a naturally aspirated engine, but one that could easily accept a Turbocharger or Nitrous Oxide for future performance enhancement. And, with my allegiance to the 6.2L engine, I wanted to base the engine on a 6.2L block. 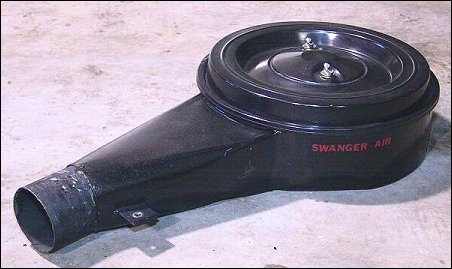
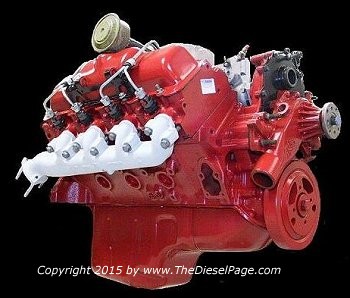
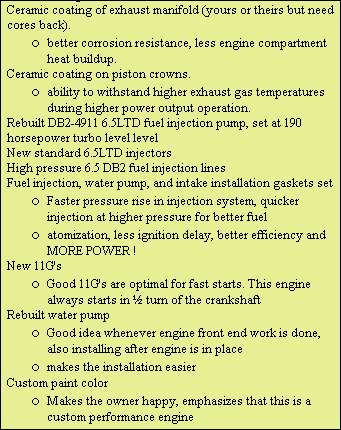
I also wanted to maintain some of the modifications I have made, such as my "Swanger Air" air cleaner and 3-inch dual exhausts via manifold adapters. "Swanger Air" is an enlargement of the air cleaner housing to hold a pair of Olds 4-4-2 455 cubic inch air filters, and a snorkel replacing the bizarre intake muffler that GM originally supplied. This photo shows the first edition "Swanger Air". I also decided to keep my Diesel Services Group "Diesel-Pro" Dual-Idler timing gear set, and the HD model 6.2L single-plane intake manifold donated by TheDieselPage.com that was part of an earlier naturally aspirated power development story. During the engine planning process, we agreed that the rotating assembly (crankshaft, rods, damper, flexplate, etc.) would be based on a balanced and polished but NOT reground crankshaft. The intake manifold, exhaust manifolds, and heads would be port-matched, the pistons would have ceramic-coated crowns, and a 6.5L turbo fuel injection system would be installed. To get the maximum fuel-rate capability, we selected the 1993 mechanical DB2-4911 Stanadyne pump and Lucas/Delphi 6.5L turbo injectors. The -4911 is the highest development of the mechanical pump used on a GM 6.5L diesel, featuring a fuel injection rate of 68 (+/- 1.5) cubic millimeters at 2000 rpm and 59.5 cubic millimeters at 3200 rpm. The old 1984 model DB2 pump was calibrated to deliver just 49 cubic mm at 1800rpm and 36 cubic mm at 4000 rpm. The larger pumping plunger set used in the -4911 head & rotor allows for a higher peak injection pressure as well as an increase in fuel delivery volume. Injecting the fuel quickly is important for developing maximum power and efficiency.
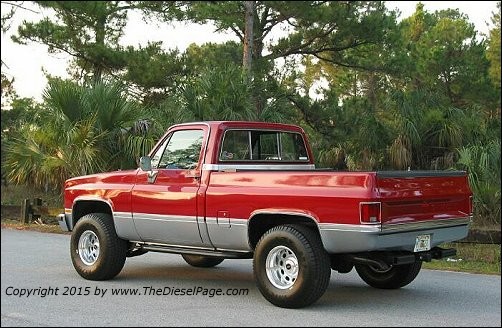
Because this was a "custom engine", I requested that it be painted a color that matched my "arrest me" red 1984 Chevrolet C10. As some of you might know, the introductory model year (1982) 6.2L diesel engines were all painted red. So, a red engine would also honor the origins of the 6.2L GM diesel. There was a goal associated with this performance engine project. With the modifications that have been documented here on TheDieselPage.com over the years, the truck's 0-60 mph times had dropped from 12.53 seconds to 11.16. I was hoping that installing a custom Diesel Depot engine and installing a fresh 6.5 fuel-injection system would push the 0-60 performance into the 10-second bracket. Read on to see how we not only met but exceeded that performance goal. Building the Engine The company selected a sound, crack-free 1993 model year 6.2L block with a single-piece rear crankshaft seal. The 10149599 block casting was shared by both the 6.2L and 6.5L engines in the 1992-1993 model years. Cylinder blocks used for the 6.2 weren't bored as large as those used for the 6.5L engines, which means all 6.2L -599 blocks can be bored to accept 6.5 standard bore pistons. Our project 6.2L block was bored to a standard 6.5L bore, leaving thicker and stiffer cylinder walls than is possible when boring a 6.5L block. This extra stiffness in the cylinder walls is thought to allow better sealing of the piston rings due to less distortion under combustion pressures. The �599 is the same block casting as that used in the 300 horsepower 6.5TD Power Project. These blocks predate the concept of piston-oil spray cooling, so there is a reduced risk of cracking that plagued many of the 1996+ models. Machining holes in the main webs for piston-oil spray nozzles did increase the incidence of main web cracks in the 1996-99 engines. (Editor's Note: This problem appears to have been solved with the latest in cast-iron metallurgy and block design changes made by AM General.) The 250,000 successful miles that the 6.5TD Power Project engine had accumulated before being sold supported the engine builder's belief that a seasoned crack-free -599 block is likely to remain crack-free. 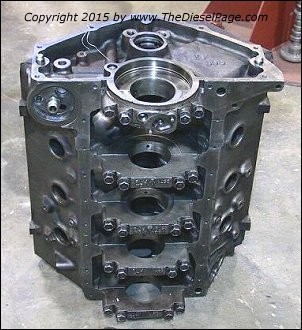
Diesel Depot also selected 1998 6.5L NA cylinder heads (-567 casting number with NA precups). The NA precups are recommended for improved efficiency and fuel economy. With a turbo engine, the turbo precups are a better choice for maximum power, but the Avants and I believed that the NA precups would be the best choice for my relatively light-weight truck (only 4200 pounds) . Jim Langford of The Diesel Depot staff disassembles the engine cores, then cleans and inspects the various engine components. Danny Durden machines these parts to recommended tolerance, and Ricky Roberson rebuilds/machines the cylinder heads. Before the crank, rods, pistons, piston pins and rings, and the new flexplate and new torsional damper were dynamically balanced, eight connecting rods were selected from a group of 60, all having a matching length to within 0.001 inch. A special measuring jig was built, where straight and reconditioned rods were torqued up and fitted with pins, then measured as shown in the next photo.
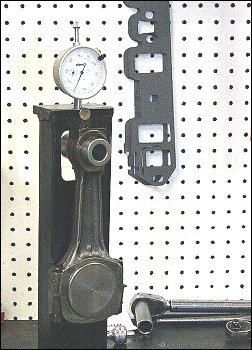
The dial indicator is zeroed on one rod, and the others sorted by how far they differ from the master rod. The rods were then fitted with "topped" Mahle pistons and rings, and assembled to the crank with King rod bearings. The "topped" Mahle pistons are manufactured with the piston pin holes drilled about 0.010 inches higher than standard to lower the crowns, to accommodate resurfaced block decks, without driving the compression ratio too high. The only reason for the high compression in the GM engines, around 21 to 1, is to facilitate starting of the engine. From a thermodynamic and performance standpoint, the ideal compression ratio for a direct injection diesel is about 13 to 1, and many large diesels in power plants or ships, which never are allowed to cool off, run around these low compression ratios. The Mahle pistons in this test engine were treated to graphite-coated skirts for low friction, and to ceramic coated crowns for future higher performance experiments, like Nitrous Oxide. Federal Mogul main bearings were selective-fit to the polished crank, to put the clearances right in the middle of the journal clearance specs established by GM for a new engine. Then the protrusion of each piston above the block deck was measured with another special tool, essentially a bridge over the piston so a dial indicator zeroed on the deck can measure the height of the piston above the deck, as shown.
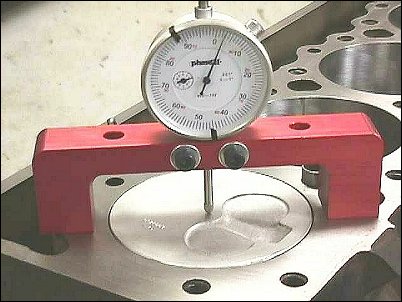
The measurements collected from all eight piston protrusions are then used to correct the plane of the block decks. Square-decking helps to make all eight piston protrusions as even as possible. As shown in the next photo, this deck cut is taken in the deck milling machine installed for just this purpose.
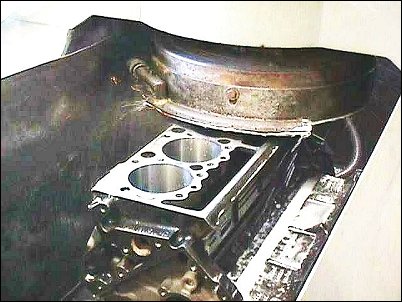
Other Custom Touches The port-matching of all the manifolds to all the ports in the heads was performed by Ye Olde Hot Rodder, Mr. Benny Avant. The appearance and durability of the engine were enhanced by baking a ceramic coating onto the exhaust manifolds in a domestic kitchen oven. Lanny Durden is the "Head Wrench" at The Diesel Depot in charge of assembling all the rebuilt engines. The engine assembly areas are the cleanest of all, fitting to the cleanliness required for a quality buildup. Fel-Pro 9701PT 6.5L head gaskets were installed under the 6.5L heads in this buildup, since these have been working best for The Diesel Depot recently. The heads were not cracked between the valves, but they had the standard water passage repair sleeves installed, which is standard practice on all rebuilt heads at The Diesel Depot. The valves were selected from teardown inventory, then cleaned, checked for straightness and cracks, and resurfaced at the seats, as were the heads. Stock rocker arms and springs were used along with a selected stock camshaft. 
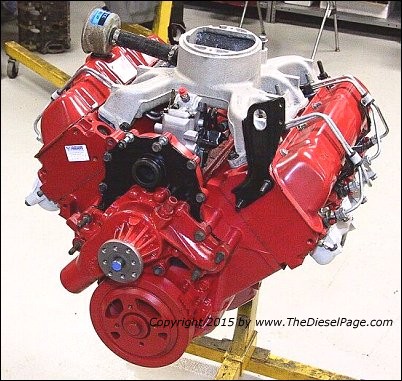
A completely dressed engine from The Diesel Depot is not lacking much, just the wiring harnesses and air cleaner. For this installation, the DB2-4911 pump was in place and approximately static-timed - close enough to get the engine running after installation, but before fine-tuning in place. The sticker on the front of the passenger-side head is a temperature telltale, that will assist in adjusting the 24-month, 24,000-mile warranty provided with Diesel Depot rebuilt engines. Close up, the temperature telltale looks like the image above. Like all rebuilders, The Diesel Depot warranty covers the parts and repairs that they performed, but excludes the cost of removal and reinstallation if done anywhere other than at The Diesel Depot. 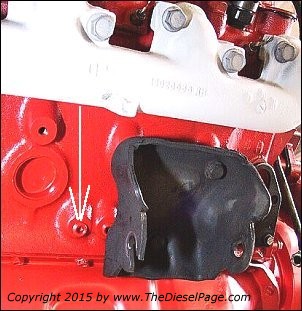
One of my pet peeves (and possibly yours as well, if you ever tried to drain the coolant out of your block) is the inconvenient location of the block drain plugs behind the motor mounts. On my first visit to The Diesel Depot we noticed that some blocks have an extra undrilled boss next to the stock boss, so I asked Jamie to tap and plug these as well. This photo shows the location of the new coolant drain plug. This location puts it where I can actually use it to drain the block. You can also see that this new drain plug is located next to the stock drain, which is partially covered by the motor mount. There is a similar spare drain on the other bank. Not every block has the extra cast-in boss for this extra drain, but the �599 block is so blessed.
Engine R&R at The Diesel Depot I arrived at Avant�s bright and early Monday morning, and before I knew it, Tim Walls, with help from Billy Todd, had my hood off, the oil and coolant drained from my engine, all the hoses and wires disconnected, and out came the old black engine. 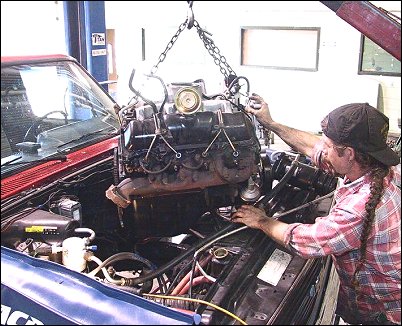
Pulling the engine required removing the upper half of the fan shroud (a Dr. Lee mod on the 1984 truck). The fan and water pump were removed while the radiator remained in place. My starter, power-steering pump, alternator, and A/C compressor were also left in the engine compartment, but tie-wrapped out of the way. With the old engine out and the new one rolled into position, it was time to remove brackets, pulleys, sensors, my Fumoto drain valve and other accessories and transfer them to the new engine.
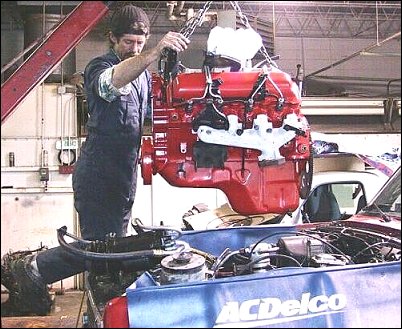
After Tim got the engine close, he jumped into the engine compartment, all 5 foot-6 inches and 130 pounds of him, and wrestled the engine-plus-torque-converter onto the transmission input shaft and bell-housing dowels. He made it look easy. After bolting up the motor mounts, all that was left was to reverse all the remaining removal steps. One of the things I made sure we did was to re-shim the alternator and water pump pulley in line with the crankshaft pulley to make the V-belt run true. Alignment is half the battle in making this V-belt live - the other half is keeping it so tight that it never slips. After filling the sump with Chevron Delo 400 15W-40 and the radiator and block with coolant, we primed the fuel filter with my auxiliary electric fuel pump, cracked the fuel injection lines on cylinders 2 & 4 and cranked it over to bleed the fuel system. The Diesel Depot has found that just two loosened injector fuel line fittings are enough to bleed the air from the injection system. On the third 15-second cranking session, the engine started to run on about 4 cylinders. Benny tightened numbers 2 and 4 injector fuel line nuts, and in less than a minute it evened out and was as smooth as could be. 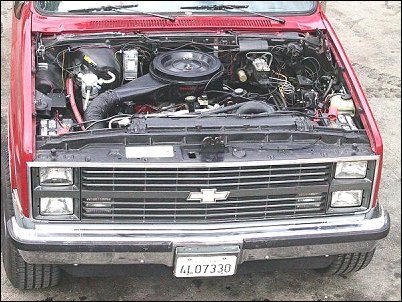
I promise, there IS a red engine in there! Jimmy Crismond, who normally tests both used and remanufactured engines on the test stand, brought the Snap-on injection pulse timing light, and set the fuel injection timing to the sweet spot, with just a bit of diesel rattle at idle. Once the timing was set, I was off, without my hood, to break in my new engine. Break-in: In a brand-new or rebuilt engine, only the top compression or fire piston rings require break-in or seating. Everything else is ready to run. To break in the rings I put some significant combustion pressure behind them, forcing them against the freshly bored and honed cylinder walls. I warmed up the engine by driving an easy 45 mph for 5 miles, then gave it two half-accelerator pulls from 35 mph to 70 mph, and cooled it down at a steady 55-60 for a couple miles. Then I did it again, this time with about three-quarter pedal, and again, and again. I kept one eye on the oil pressure, one eye on the speedometer, one eye on the Exhaust Gas Temperature Pyrometer, one eye on the road, and one eye on the rearview mirror. The EGT never went over 1000 �F, but I "tickled" it a couple of times. Once back at the shop, we changed the oil and filters, and I was nearly ready to head back to Miami. 
Benny and Jamie said not to be concerned about getting on it, and I told them they would hear me leave. I put the pedal to the metal as I headed out their driveway toward the road, and heard that lovely squeal as the rear kicked out ever so slightly, and I knew I was leaving some rubber on their pavement as a souvenir. Heading for I-75, I glided up every hill on the two-lane in locked-up OD. The truck had a smooth power delivery that I had never experienced before. NO DOUBT this was a different engine. I topped off the fuel tanks and pointed the truck toward Miami. 516 miles later I added another 24.2 gallons of No. 2 Diesel. That is 21.3 mpg, mostly on cruise control at 75 to 77 mph (slow for I-75) and using the air conditioning for the Southern half of the trip. I was very surprised by the significantly lower exhaust gas temperature readings showing up on my pyrometer. Instead of 700°F to 850°F I was used to seeing at cruising speeds between 70 mph and 80 mph, the gauge was indicating 600°F to 650°F. The idle EGT was also down from 300°F to 250°F. Fearing this might be due to unnoticed damage to my pyrometer probe during the engine swap, I asked John Kennedy of Kennedy Diesel to send me a new probe. The new probe read just the same as the old one, so I had to conclude that the new engine ran cooler due to the efficiency improvements. 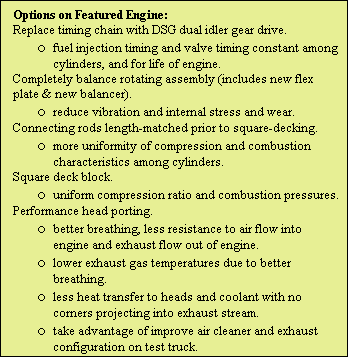
Back at work in Miami, the Clevite Kid pulled the truck into the office parking lot that morning because the other engineers wanted to see the new engine. I carefully lined up with my parking space 150 feet away, made sure the wheels were straight and punched it. There are now twin rubber streaks thirty feet long (they stop only because I lifted off the accelerator) on the concrete thanks to the new high performance diesel and the Auburn limited slip, and the engineers came piling out the door to see WHAAASSSUPPPP?? Who needs a turbo when I can light up the 33's by just pushing down with a heavy right foot? Next assignment, fire up the G-Tech accelerometer on a Sunday morning. An average of three runs gave the result: Zero to 60 mph in 9.52 seconds. So much for the goal of a 10 second truck! Even Dr. Lee underestimated the potential of this High Performance Naturally Aspirated engine. When I reported these results to the Editor of www.TheDieselPage.com, he asked how it did without the Nitrous. I was happy to tell him that this WAS WITHOUT Nitrous, and that the best is yet to come.
Analysis Why is this engine SO MUCH better than the one I left behind? Because everything is correct, and this engine is not 18 years old with 150,000 miles on it. The total approach yields results far ahead of incremental improvements. Step 1, Get the air in: Swanger Air, a new Amsoil air filter complements of Greg Landuyt, port matched intake manifold and heads, and fresh heads with a valve job all combine to offer the least resistance to the induction of fresh combustion air. Step 2, Compression: A freshly bored and honed block, new rings properly seated, stiff 599 block casting at standard 6.5L dimensions all work together to develop the maximum compression pressure. Good compression means higher combustion air temperature, and better combustion. Step 3, Injection: With the DB2-4911 pump injecting 68 cubic milliliters of fuel through 6.5L turbo injectors, the fuel is introduced faster, better atomized, and ready to burn faster.
Step 4, Combustion: I use a combination of Stanadyne Blue Label and Plus-4 additives for higher cetane, which means less delay between injection and the beginning of combustion. The better atomization provided by the injection system also improves combustion. The fuel burns faster, raising the pressure earlier in the power stroke, and the ceramic coating on the aluminum pistons (the components with the best heat transfer if bare) keeps more energy in the cylinder, so more energy is extracted during expansion on the power stroke. Good rings and cylinder bore honing mean less power loss to blow-by. Step 5, Exhaust: Minimum pumping losses are achieved from matched head and exhaust manifold ports, my exhaust adapters on the manifolds (shown in the photo below), and 2.5" adapters immediately opening to my 3" dual exhaust system. 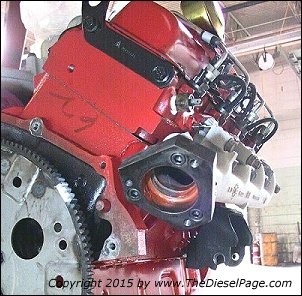
The result? More power, less smoke, lower exhaust gas temperatures (250°F at idle, 600°F at 70 mph cruise), and better fuel economy. Even under full acceleration, there is minimal smoke from the 190 hp fuel rate, so the engine must be making close to 190 hp. Does the driver of any N/A GM or 6.9L Ford diesel want to take me on to try to prove that this Diesel Depot Custom Rebuild is not clearly superior? Even some turbo diesels better run and hide if they see me coming! Final word: What will a duplicate of this engine cost? According to Jamie Avant and Benny Avant at The Diesel Depot if you have an old 6.2L engine as your core, a clone of the project engine will cost just over $6000 (2003 figures). A similar engine based on an older seasoned two-piece rear real 6.2L block can be put together for around $4750 exchange. The author would like to extend his thanks to John Kennedy of Kennedy Diesel for providing the new plug-in pyrometer probe, to Greg Landuyt of Lubrication Specialists for providing an Amsoil custom 6" high air filter for future improvements, to TheDieselPage.com for encouraging everyone to pursue this project, and of course many thanks to the staff and management of The Diesel Depot for the opportunity to explore the performance limits of a naturally aspirated GM diesel. Stay tuned for further data with Nitrous Oxide. TDPAbout the Author: Dr. Lee Swanger is a consulting engineer trained in mechanical engineering and metallurgy. Currently he is a principal engineer with a major engineering consulting firm, and a significant part of his work deals with large diesel engines in stationary power and marine propulsion. Prior to his current position, Lee was Director of Research and Development for Clevite Bearing Company, and received his engineering degrees from Case Institute of Technology in Cleveland, Ohio and Stanford University in Palo Alto, California. Lee is a Registered Professional Engineer in Ohio, California, Virginia and Florida. The opinions that Dr. Swanger expresses here are his alone, and may not be attributed to his past or present employers, or to The Diesel Page. Sources:
The Diesel Depot
Kennedy Diesel
Lube Specialist
What's New: | Feature Articles: | Product Reviews: | Member's Area: Join Us: | Duramax Diesel Page: | Advertisers: | Classified Ads: | Books:
Send e-mail to: turbo@TheDieselPage.com |