Electric Lift Pump and Racor Filter for the Early Diesels
-and a Performance Update-
"The Clevite Kid"
My last true diesel engine articles ("6.2L Engine Upgrades, Parts I and II", now available in the "6.2L Diesel volume") described the process of installing a non-EGR intake manifold, a rebuilt DB-2 fuel injection pump and injectors, as well as replacing my camshaft chain and sprockets. However, that article did not document any performance improvements. In addition to describing an auxiliary fuel filter and electric lift pump installation this time, I'll also discuss the performance changes since the last time you read about my 1984 6.2L Chevrolet C10.
Of course, there are several reasons why a year has gone by since the performance upgrades and this report. One good reason was to allow the new injection pump and injectors time to get acquainted with one another, and settle in. The new injection system components are doing just great, and I am spoiled by routine starts in about ˝ turn of the crankshaft. Of course a fresh rebuilt starter, good batteries, excellent battery connections, and the Miami climate all contribute to ease of starting.
Another reason for the delay in reporting my 6.2L performance changes is that before installing a fresh Stanadyne DB2, I broke the yellow tamper-telltale paint and turned up the fuel screw 1/8 of a turn.
Why an electric lift pump, and a Racor filter?
To continue the technical improvements to my truck, I have added an electric lift pump to assist in starting, to be an on-board backup to the engine-driven mechanical lift pump, and to easily reprime the Stanadyne fuel filter on the firewall after routine (or emergency) fuel filter changes. Both the new electric and original mechanical lift pumps are operating in series, since both of them have automatic one-way check-valves that will allow fuel to pass through only in the forward direction.
WARNING: If the mechanical lift pump were to fail, the electric lift pump would be able to keep me going. However, soon after diagnosing a mechanical pump problem, I would bypass the mechanical pump. If it fails by cracking the diaphragm, the electric pump could pump fuel into the crankcase, and destroy the properties of my Chevron Delo 400. If the mechanical pump fails by developing an external leak, the electric pump could cut my fuel mileage considerably, while washing the underside of my truck with a kerosene-equivalent solvent.
The electric lift pump was purchased from Autozone, part no. E 8012 S, for $39.95. Autozone is also now selling genuine AC fuel pumps, but the price is about twice what I paid. I tested my new pump with diesel fuel, and found that it draws 1.5 amps while pumping.
The warranty on the Autozone electric lift pump requires that a fuel filter be used between the fuel tank and the lift pump, and so I selected a Racor filter made to filter diesel fuel. The filter is Racor’s model 645, which features a 45 gallon-per-hour throughput capacity, and a clear fuel-proof plastic bowl (with built-in drain) for easy visual water and crud inspections. I expect to be changing this filter about every 10,000 to 20,000 miles. More details on this filter can be seen at http://www.parker.com/racor/spn_intro.html.
On our Diesel mailing list, questions have been posted regarding concern over the extra pressure drop that an added filter might cause. Racor’s technical support engineers told me that at a flow rate of 45 gallons per hour (enough for 600 horsepower) the pressure drop is about 1/3rd of 1 pound per square inch. The pressure drop at full tilt is probably about 1/10th psi, i.e. not enough to worry about.
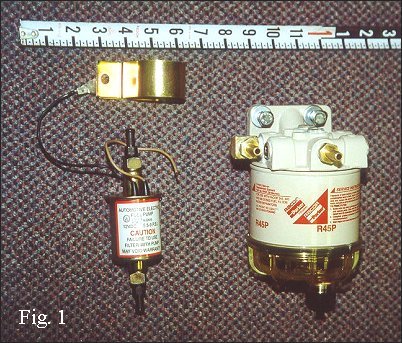
Figure 1 shows the pump and filter before installation; the ruler will give you an idea of the space you will need to find under your truck for these components.
Jim's Notes: According to GM, autopsied failed electric lift pumps have revealed that approximately half were due to water contamination, and the other half due to valve jamming caused by contaminated fuel (dirt, metal particles, etc). An auxiliary fuel filter is just the ticket for these failure prone situations. As originally equipped, the lift pump operates on the "dirty" side of the single factory fuel filter.
Mechanical installation
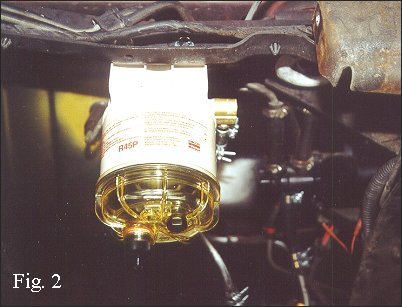
My 1984 shortbed truck has two holes in just the right place on a cross-member to fit the Racor filter mount. I pre-installed 5/16" brass barb fittings for fuel hose using Teflon pipe paste – Racor says, "Do not use Teflon tape." Figure 2 shows the filter and mount in place under my truck.
Next I removed the right (passenger side) exhaust system, and found a hole in the top flange of the passenger side frame rail at the correct spot to install the electric lift pump. I grounded the black wire from the pump to its bracket, and mounted the pump bracket to the rail with one bolt.
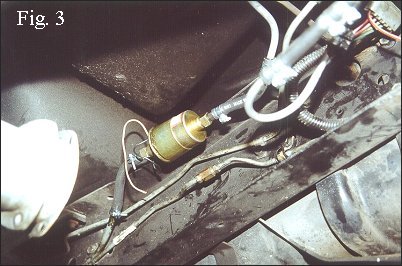
Figure 3 shows the pump in place, and with the fuel lines connected, but the brown +12VDC wire still hanging loose.
The fuel lines were bent up from 5/16" steel brake lines, which work just fine for fuel lines, too. Steel is preferred for durability, and because it will not tend to collapse under prolonged vacuum from the lift pump. It also stays where you put it, once you bend it to fit.
When you are disconnecting and cutting fuel lines, have a pan underneath because you will spill some fuel. I found that the OEM steel GM fuel line from the selector valve to the Stanadyne filter on the firewall is NOT 5/16", a standard fuel line size. It is a smidgen larger, just under 11/32" (about 8.5 mm), but 5/16" fuel hose fits over it nice and tight. The steel tube was connected with short lengths of 5/16" reinforced rubber fuel line, with double hose clamps on the straight tubing, and single clamps on the barbed fittings. I put a dab of Permatex #2 sealant (the non-hardening one) to act as a lubricant when assembling the system, and a sealant as it sets up.
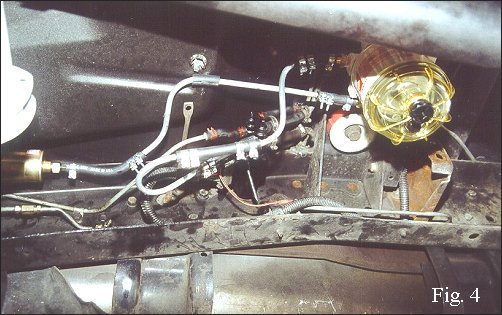
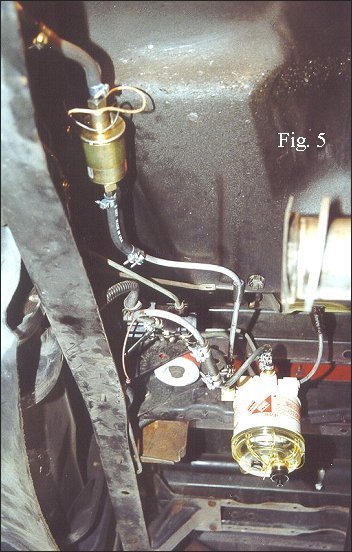
Figures 4 and 5 will give you two different perspectives of the tubing installation.
Time to get the engine going again. But I could not get the Racor filter element off by hand to prefill it, and I could not drive to the parts store to buy the correct filter wrench. The Racor instructions say to install filter elements only hand tight, but it would appear Racor has an assembly line machine that has very strong artificial hands. Since I needed to drive my truck, I opened the air bleed on the Stanadyne filter mount in the engine compartment, hot-wired my new electric fuel pump, and sucked fuel into the new Racor filter, through the fuel lines, and out the air bleed. Exactly what it is supposed to do!
Do not give in to the temptation to start the engine without bleeding the fuel system. The filter will have some air in it, the electric fuel pump will have some air in it, and all those fuel lines you drained into the pan on the floor now have air instead of fuel. You WILL airlock the secondary filter, and MAY airlock the DB-2 fuel injection pump. You can follow the friendly DieselPage instructions to recover from an airlocked injection pump, but why bother?
Electrical hookup:
Two achieve my goals, I need to power my new electric lift pump from either an ignition-switched power source for normal running, or directly from battery, with the key off, for priming new filters. I also plan to run with no power to the electric pump, to save it for emergencies.
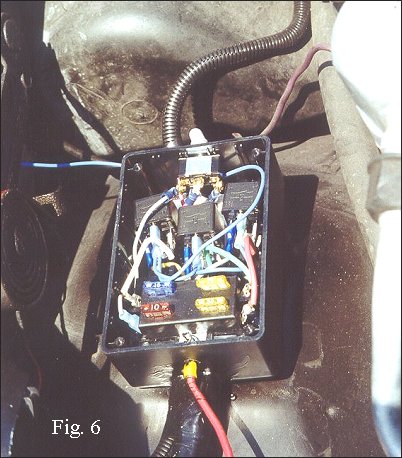
In Figure 6, you can see the box that sits on my passenger side fender where the jack used to live. Coming in from the bottom is the red 10-gauge wire that provides battery power to the headlight fuses and relays (for brighter headlights), as well as the new electric lift pump, which is useful when priming the fuel filters and fuel line. The SPDT (single pole, double throw) toggle switch selects either direct battery power through the 10-amp fuse in the lower left corner of the box for priming, or ignition switched power from the fuse block in the cab, for normal operation. Since the electric pump only draw 1.5 amps, I did not use a relay to control the power. The center terminal of the switch is connected to a wire that runs to the brown positive lead on the electric pump. In the position shown, the normal position, the pump is connected to the ignition-switched power. When priming a new fuel filter, I just flip the switch to the right and pump fuel into the clean filter.
Inside the cab, there is another SPDT switch on dashboard, with a center off position. Flipped up, the switch directs power from the ignition circuit on the truck’s main fuse block through an oil pressure switch (NAPA PN 701-1575 – thanks John C.) to the selector switch under the hood, and on to the pump. In the down position, power is routed around the oil pressure switch so that the DB-2 fuel injection pump can be pressurized and purged before starting. After a "long" shutdown (more than 4 or 5 days) I will flip the dash switch down to pressurize the fuel system while the glow plugs heat. After the engine starts, I return the switch to the OFF position.
Performance update:
The biggest performance improvement came after replacing the 3.42 Richmond gears with new lower 3.73 gears (3.42's subsequently sold to a DP member for $50 with only 20,000 non-towing miles on them). The new 3.73 set are also Richmond brand, bought from Summit Racing. Since the First Annual Diesel Page Rendezvous, I have added atachometer so I can see the effect of gearing changes, among other things. With the 3.42 gears, I was turning just under 2000 rpm at 80 mph (700R4 in OD). Now, I can scream down the road at the same speed while the engine is revving slightly higher at 2150 rpm (33" tires).
Before the most recent performance upgrades, this truck was producing 0 to 60 mph acceleration runs at an already great 11.8 seconds, as measured with the G-Tech performance meter. Since those numbers were generated, I've installed a late-model 6.2L heavy-duty single-plane intake manifold (no EGR) courtesy of The Diesel Page, a turned-up and rebuilt heavy-duty DB-2 injection pump and rebuilt injectors, and a new Sealed Power timing set purchased from US Diesel Parts in Montana.
So, with a light fuel load, all my tools, spare oil and coolant, turnpike change, jack and other heavy stuff off-loaded, a double-dose of cetane improver (Stanadyne Blue and Four Plus), and injection timing optimized, I went out to smoke the track. It was a cool morning (all things are relative, in Miami 75° F is a very cool morning in May) when I tached it up, got off the brake, and let her rip. The result: 0 to 60 in just 11.1 seconds...... We don’t need no stinking turbo!
Are there any additional 6.2L NA performance mods in my future?
What else would I do to my happy little naturally aspirated 6.2L, if I were in the mood? Perhaps the exhaust manifolds would get some attention. Matching the ports to the heads would have to help.
But, the key to making more power is BURNING more fuel. If you just inject more fuel without burning it, all you get is more smoke and a higher EGT. To actually burn more fuel, we need to pack more oxygen into the combustion chamber (that's what a turbo does). Propane is not the answer for NA engines – because propane displaces precious oxygen needed to burn fuel. So what would I do?
I could add more oxygen by injecting nitrous oxide (N2O) into the intake air stream. Nitrous oxide is 36% oxygen, compared to 21% oxygen in sea-level air. Since nitrous oxide can be injected into the intake manifold as a liquid, its evaporation can also cool the incoming air charge by up to 30° F, creating denser intake air and packing yet more oxygen into the cylinders. With the ability to burn more fuel, I could turn the DB2 fuel metering screw by as much as another 1/8 turn clockwise, for a total of Ľ turn. This would produce, in practical terms, chemical turbocharging.
Yes, I have thought about it, and I have corresponded with some Diesel Page members who are playing with nitrous oxide. Member Bill Heath has used nitrous successfully in his drag race truck, but no one has any hard performance improvement numbers for street use yet.
Will The Clevite Kid go for it? Maybe, maybe, . . . . . . perhaps, . . . could be, . . . .

About the Author
By vocation, Dr. Lee Swanger is a consulting engineer trained in mechanical engineering and metallurgy. Currently he is a principal engineer with a major engineering consulting firm, and a significant part of his work deals with large diesel engines in stationary power and marine propulsion.
Prior to his current position, Lee was Director of Research and Development for Clevite Bearing Company, (hence his nickname) and received his engineering degrees from Case Institute of Technology in Cleveland, Ohio and Stanford University in Palo Alto, California. Lee is a Registered Professional Engineer in Ohio, California, Virginia and Florida.
Disclaimer
Neither the author nor The Diesel Page will be responsible for any reader’s implementation of the system described herein. Each reader must make his own determination if this type of modification is suitable for his application, he understands the consequences of a poor installation, and is capable of doing the work in a safe manner.
What's New: | Feature Articles: | Product Reviews: | Member's Area:
Join Us: | Duramax Diesel Page: | Advertisers: | Classified Ads: | Books:
Send e-mail to: turbo@TheDieselPage.com
Copyright © by The Diesel Page
www.TheDieselPage.com