|

Phaser
Dual-Idler 6.5L Gear Drive Timing Set
By Scott Boelman
www.TheDieselPage.com
This product review first appeared here in The Diesel Page in 1998. Many product reviews have come and gone since that time, and we sometimes forget just how important these can be to owners of the 6.2L and 6.5L diesels. This month, we're re-introducing Scott Boelman's Phaser gear drive review, along with a few edit changes and updated source information. We care about your 6.2L/6.5L diesel ownership. Let us know how we can help you. - TDP
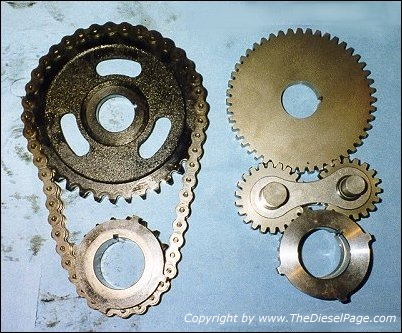
Available for nearly 20 years, the Phazer Dual-Idler gear drive timing set for the 1994 and newer 6.5L Turbo Diesel replaces the stock chain-driven timing set and the original reluctor wheel used for the crankshaft position sensor. Advertising claims at the time said: "Our "Phaser" performance kit allows 3-5 degrees of timing advance right off the crankshaft, which we found to increase fuel economy, produces cleaner starts, and improves throttle performance." We'll install the Phaser, and test the ad claims.

I installed the Phazer kit, like that shown on the right, in my 1994 Chevy with the 6.5L Turbo Diesel. The Phaser kit includes a new reluctor wheel and the other gear-drive items shown here that take the place of the factory chain-driven timing set components. The pictured CNC machined reluctor wheel works with the crankshaft position sensor in the EFI engines to provide the vehicle computer (PCM) accurate crankshaft position information. The included reluctor wheel, shown in the upper right of this photo, is the only real difference between the Phaser kit and the standard 6.2/6.5 Gear Drive kit produced for the mechanically injected 6.2L/6.5L diesels. Because the reluctor wheel is a separate piece, the gear drive can also be used in any 6.2L or 6.5L mechanically injected engine.
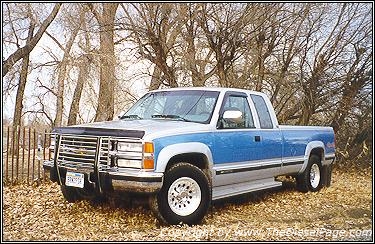
This truck now has 250,000 miles on the original engine, and I thought it might be about time for a new timing set. Timing chains do wear over time, which can affect the accuracy of the injection timing. The installation was accomplished without a problem and the performance improvements I've seen definitely confirm the ad claims and then some.
The installation is fairly simple when using the proper tools and following the simple instructions. The following is a list of the tools I used to complete the installation. Further on, I'll include a few hints that will make the installation of your gear drive a simple and straightforward process. The only question I had before beginning the installation was crankshaft positioning and timing mark alignment. This is also one of the more critical steps of the installation because of how critical proper timing is. If you follow the instructions below, you shouldn't have any problem maintaining the correct timing relationship while installing the various gears.
Special Tools Needed:
- Harmonic balancer puller and installer
- Gear Puller
- GM tool #J-41089 is used to loosen the three nuts on the injection pump. An S-shaped 15mm wrench should also work. (Jim's Notes: I've used a regular 15mm 12 point box end wrench to R&R both the DS4 and DB2 injection pumps. The GM tool would make the work easier, however.)
- A set of deep metric sockets will also make things easier.
Parts Needed:
- Phazer, Dual-Idler Gear Drive kit from KennedyDiesel.com
- Fel-Pro front cover gasket kit (Part # ZFE-TCS45554) from auto parts store. This Fel-Pro kit includes all necessary gaskets and costs about $12 (in 1998).
- RTV black automotive gasket sealant.
- Antifreeze (Now is a good time to flush and fill with new coolant.)
- Optional: Radiator rebuild, new water pump, hoses and serpentine belt. (I took this opportunity to rebuild the radiator and install the 1997 model year hi-capacity 130-gpm water pump and dual thermostat crossover housing.)
Removal and Installation Instructions:
- Disconnect the negative battery cable from both batteries.
- Remove the upper half of the fan shroud and then the fan. Removing the fan shroud and fan gives you a lot more room to work while removing the other components on the front of the engine.
- Remove the serpentine drive belt.
- Remove the alternator.
- Remove the power steering pump and set it to the side, but don't disconnect any hoses.
- Remove the vacuum pump (note: I didn't need to remove the AC compressor.)
- Drain coolant from radiator. To do this, I removed the upper radiator hose and siphoned the coolant into a bucket. What you can't siphon will spill when the water pump is removed, so have a mop and bucket handy.
- Remove the oil fill tube.
- Remove the crank pulley bolted to the harmonic balancer. Set the timing mark on the harmonic balancer to 0 degrees. To do this, rotate engine clockwise using a 15/16" socket, short extension and flex-handle on the harmonic balancer bolt.
- Remove the water pump and backing plate. Label all of the backing plate bolts when doing this, it is very important to replace the bolts in their original location or you could crack the block according to a GM technician.
- Remove the injection pump driven gear from the injection pump. Be careful not to drop the bolts into the engine. Prior to removal, make sure the dot on the injector pump gear is at the 12:00 position. If not, rotate the harmonic balancer clockwise one full turn, returning the timing mark back to 0 degrees. This will place dot on injection pump driven gear at the 12:00 position.
- Unbolt, but do not remove the fuel injection pump. Aside from unbolting the injection pump from the front cover, the injection system and the intake manifold do not need to be disturbed to install a new timing set. Be sure to scribe a mark on the pump mounting flange and front cover prior to loosening the nuts. This scribe mark will be used as a timing reference during re-assembly.
- Remove the harmonic balancer using a harmonic balancer puller. To remove the harmonic balancer bolt, place the 4 pulley bolts back into the harmonic balancer and use a pry bar between two of the bolts to prevent the engine from rotating. If the engine rotates slightly when removing the bolt, return the mark on harmonic balancer to 0 before pulling the balancer all the way off.
- Remove the front timing cover. With the timing cover removed, you can verify that the timing marks on the camshaft and crankshaft sprockets are facing each other. The camshaft dot should be at the 6:00 position and the crankshaft dot at the 12:00 position.
- Stuff clean rags into the opening at top of oil pan to prevent dirt and stray parts from contaminating the engine.
- Remove the drive gear bolted to the camshaft.
- Remove the camshaft sprocket.
- Remove the original reluctor wheel and crankshaft sprocket (1 piece). Be careful not to drop the Woodruff keys into oil pan. I used a gear puller to remove the sprocket assembly.
- Remove the Woodruff keys. I drove them out with a punch.
- Clean all removed parts and engine block mounting surfaces.
- Install the new single piece Woodruff key supplied with the Phaser kit.
- Install the new Phaser crankshaft gear.
- Install the new Phaser camshaft gear and injection pump drive gear.
- Install the dual-idler gears per the Phaser's instructions included with the Phaser kit. Clean the cam bolt, coat the outer 4 threads with Loc-Tite thread locker, then torque the cam bolt to 75 ft/lbs (Newer model 6.5 engines use a cam bolt torqued to 125 ft/lbs. Consult GM manual for your model year engine.)
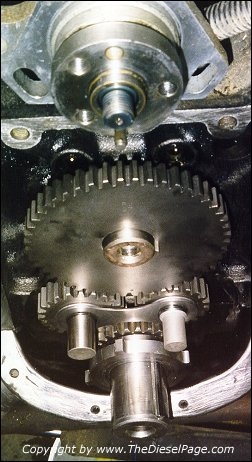
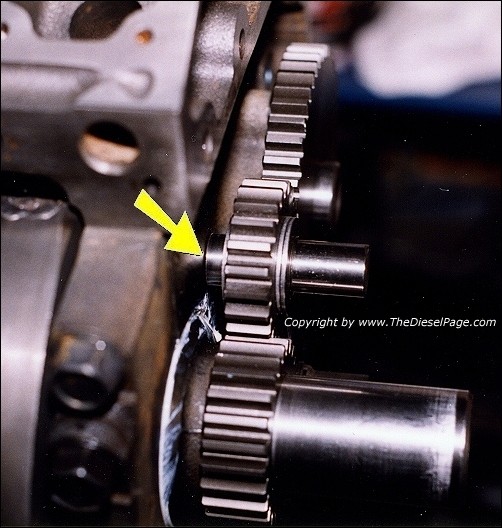
- The idler gears must have adequate clearance both within the gear teeth engagement and fore-aft. The axle shafts for each small gear must have some clearance fore-aft so the gears don't become trapped when the aluminum timing cover is bolted on (see arrow). I placed strips of typing paper between the axle shafts and the engine block, and then bolted on the front cover. The paper strips should pull out easily. If not, you'll need to remove material from the rear of the axle shaft to increase clearance. The included instructions cover the important points, but just remember that gear play must exist or there could be gear drive failure.
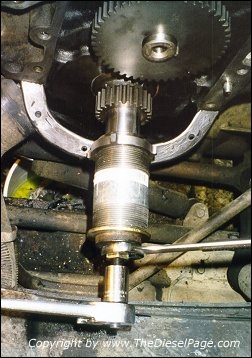
- Install the new reluctor wheel. My reluctor wheel did not slide on easily. I fabricated a gear installer tool to install the reluctor wheel (see above picture). If you experience any difficulty with the installation of any individual component in this kit, give KennedyDiesel.com a call to get their advice.
- Temporarily re-install the harmonic balancer on the crankshaft and rotate the engine clockwise one full revolution until timing mark on harmonic balancer is returned to 0. This will place the dot on the injection pump drive gear (on the cam) at the 12:00 position. Returning the dot on the injection pump drive gear to the 12:00 position is important when re-installing the injection pump driven gear as described in step 29.
- Install the front engine cover. Don't forget the new injection pump gasket, front cover gasket and new front crank seal. Torque the harmonic balancer bolt to 200 ft/lbs.
- Bolt the injection pump back onto the front cover. Align the previously made scribe marks. If your timing chain was a little sloppy, rotate the top of the injection pump toward the passenger side a little (retarded). If (for example) your timing chain produced 3-4 degrees of chain slack, rotate the injection pump about 1/16" toward the passenger side from where it was originally. Doing this should get you close to the correct timing position and you shouldn't have any trouble starting the engine.
- Install the injection pump driven gear (on the injection pump). The dot on this gear should be at the 6:00 position, matching the dot on cam drive gear (which should be at the 12:00 position).
- Remainder of installation is the reverse of removal.
- Have the timing reset by a GM technician.
Timing Specifications:
A) For 1994 and 1995 engines, set the TDC Offset to -1.94. Set the Time Balance to 3.5 to 5.0 degrees.
B) For 1996 and newer engines, set the TDC Offset to -1.70 to -1.90. Set the Time Balance to 3.5 to 5.0 degrees. Note: I watched the GM Technician while he set the timing. He used 3 different 15-mm wrenches to loosen and tighten the 3 nuts on the injection pump.
- Change the engine oil and filter just in case any dirt fell into the crankcase.
Results:
The engine running changes I saw following the Phaser installation were noticeable even during my first test-drive. Prior to the installation of the dual idler gear drive, my truck produced a drivetrain vibration at 2300 to 2500 RPMs. I suspected the vibration was coming from the transmission and was even considering rebuilding my 5-speed. However, during my initial test drive, I noticed that the vibration had disappeared. Apparently, the vibration was due to the timing variance produced by the original chain driven timing set.
With the original timing set, my truck would start and run fine for about one second, but then stumble and a puff of white smoke would come from the tail pipe. However, the engine always recovered and ran normally afterward. I suspected faulty glow plugs. This particular problem has completely disappeared with the installation of the dual idler gear drive, confirming the Phaser's claim of improved starting. My truck now starts quickly with no smoke and continues to run smoothly.
I also noticed a smoother power delivery while driving the truck. The "jerkiness" that I experienced while accelerating or decelerating has been eliminated.
Now for the numbers.
I carefully calculated my fuel economy during the 1588 miles prior to installing the Phazer kit. During this time, my truck averaged 16.9 mpg. In the 1758 miles since the installation, my fuel economy has improved to an average of 17.4 mpg. This is a 3% improvement in fuel economy. Driving conditions were similar for both test periods, primarily highway driving at 70 to 75 mph.
Power runs using full throttle can provide a good measure of engine power changes. However, acceleration testing a manual transmission equipped truck presents a slight problem in reproducibility. Minor changes in technique from one run to the next could produce big changes in elapsed time. To minimize driver error I ran the acceleration tests in 5th gear from an indicated 45 mph to 75 mph (similar to a passing acceleration test). Prior to the installation, a series of 45-75 mph 5th gear acceleration runs produced an average of 17.41 seconds. Following the Phazer installation, the average elapsed time was reduced to 16.96 seconds. This is an improvement of 0.45 seconds and translates into a 2.7 percent faster time.
So how does the Phazer kit increase fuel economy, starting and performance? In three words, it "reduces timing variance". The Stanadyne DS4 electronic fuel injection system is a precision piece of equipment that performs best when tolerances are kept to a minimum. Since a typical chain driven timing set can produce up to 3-4 crankshaft degrees of variance due to chain slop, the Phazer kit improves engine performance by creating a more precise timing system. The CNC machined reluctor wheel also allows for more timing advance than the OE system, which further improves engine performance and provides more latitude in engine tuning. I was told that gear driven timing sets could be noisy. While you can hear the gear noise with the oil filler cap removed and with the engine running, I haven't noticed any additional noise due to the Phazer kit.
Overall, I am very pleased with the results of the gear drive installation. The Phazer kit improved the engine performance enough to justify the expense and effort involved, and the elimination of that pesky vibration and starting problem I experienced was a real bonus. Since this installation, hundreds of 6.2L/6.5L owners have installed the gear drive, and after millions of miles the usefulness of the Phaser Gear Drive timing set is beyond question.
Scott Boelman
Gear Drive Source:
Kennedy Diesel
Call: 715-255-9433
www.KennedyDiesel.com
TheDieselPage.com
What's New: | Feature Articles: | Product Reviews: | Member's Area:
Join Us: | Duramax Diesel Page: | Advertisers: | Classified Ads: | Books:
Search The Diesel Page:
Send e-mail to: turbo@TheDieselPage.com
Copyright © 1998-2018 by The Diesel Page
www.TheDieselPage.com
|
