|
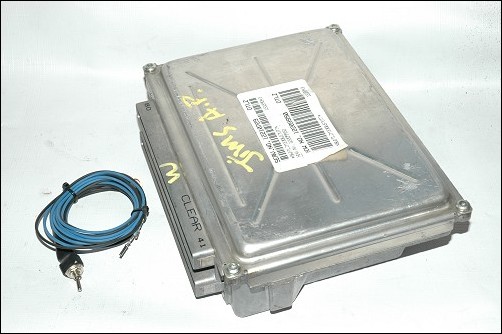 Custom Programming the Duramax ECM More Power - Better Fuel Economy! Part I - 2001-2004 LB7 Duramax 6600  One size doesn't necessarily fit all. The various electronic power products have done a remarkable job of increasing Duramax diesel performance, but till now, we've had to accept whatever programming or tuning options were offered by the aftermarket. The recent appearance of custom ECM (Engine Control Module) programming has increased the number of options for nearly every truck owner, whether they're looking for a few more miles per gallon, a safe towing program or a killer track tune. Kennedy Diesel is now offering custom ECM tuning, which provides for a host of additional programming features. KD is currently offering a variety of tunes that begin with a couple of different fuel economy versions that have produced up to a 2 mpg improvement, to power increases in 20 hp increments all the way up to the giant killer 250. Perhaps one of the best features of the KD tunes is that the ECM can be programmed with two tunes at the same time. The driver can then switch between the two on the fly. Some might opt for a miserly fuel economy tune in combination with a towing tune, or if competition is in your future - a 100 hp "daily driver" tune and a 250 hp track tune. The better EFI-Live vendors will invest a considerable amount of time and effort to produce performance tunes that maintain the drive-ability manners of the Duramax/Allison. The 100 hp street tune I tested does this by incorporating a linear fuel progression curve, that with a boost pressure of 32-psi produces very little smoke. Even the 250 tune remains fairly street-able, though it will require nitrous to burn clean. But, I'd recommend reserving this one for the track or the dyno. See the (632 dyno HP video clip). In addition to a wide range of fuel economy and/or power tunes, custom programming also allows you to correct the speedo/odo when making tire size or gearing changes, increase/decrease or remove the vehicle speed limiter, or raise/lower the engine's governed RPM. Likewise, you could also request that power be reduced for a company work truck. In short, most vehicle operations that are controlled by the ECM can be modified to suit your needs and application. Follow along as we install a KD custom-tuned ECM and switch assembly. 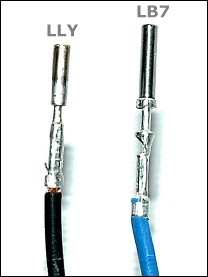 A switch gives the driver the option of switching between two different tunes stored in the ECM. The included switch and wiring come pre-assembled with two ECM wires, one matching an LB7 and the other an LLY ECM electrical connector. Depending on what version Duramax you have, simply snip off the other wire somewhere close to the switch. The switch also includes a ground eyelet that can be fastened under the switch on a grounded metal surface. Toggling the switch simply applies or removes a ground to the ECM blue connector C1 pin-31. We'll show you how to insert the new pin and wire into the electrical connector, as well as how to remove and replace the ECM. The ECM incorporates two large 80-pin electrical connectors. One is labeled "Clear" and the other "Blue", which will be identified more clearly later on. The pictured ECM was supplied by KD, allowing us to keep our truck's original ECM. In addition, our truck had been using a 2001 model year ECM, which doesn't have the programming flexibility offered by the 2002/2003 model year ECM's. Upgrading in model years wasn't a problem, as they're connector and programming compatible. That said, KD can upgrade the 2001 ECM with later model year performance/fuel economy programming. 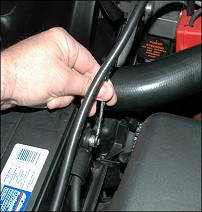 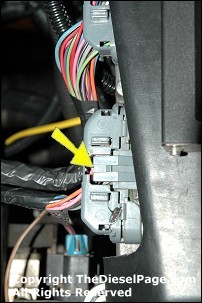 Begin by unbolting the negative battery terminal from both batteries. An 8mm or 5/16" wrench can be used to loosen/remove the battery cable. In addition, I also removed the driver's side battery to allow more access to the ECM and its electrical connectors. Removing the TCM (Transmission Control Module) and cover from the back surface of the radiator fan shroud will provide better access to the ECM. The TCM cover is held in place by two 10mm hex-head bolts near the top of the cover. Once off the fan shroud, unplug the two TCM electrical connectors by squeezing the locking tabs on each side of each connector (pointed to in photo). Be careful and deliberate. Take your time. Set the TCM and cover in a safe location. 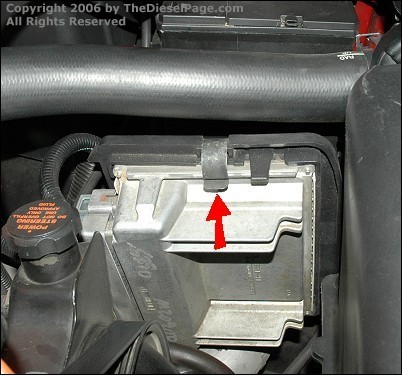 Remove the black plastic ECM cover by releasing two tabs, one near the top rear corner and the second near the bottom front corner. Release the top/rear tab first - it will take some pressure. The bottom tab will release easier. Then release the plastic wiring loom clips securing the wiring harness to the cover, and then slide the cover straight up. The ECM is held in place by both a plastic tab and a metal clip. Use pliers to grasp the metal clip (pointed to in photo), then rotate out & up. Once the metal clip is disengaged, lift the plastic tab with your fingers. The ECM is now free to tip out and up. Leave it loose, as repositioning it slightly may help when unbolting the two electrical connectors. 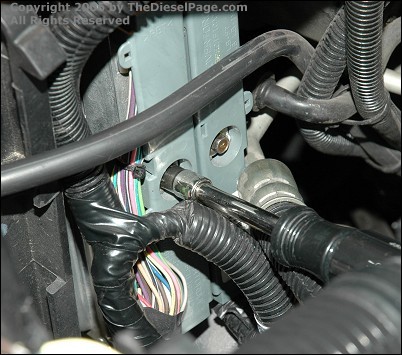 Each 80-pin electrical connector is held in place by a bolt having a 7mm hex-head. In this photo, I used a 7mm nut driver to loosen and remove the connectors. The bolts are "captured" which will cause the electrical connectors to "back-out" of the ECM as the bolts are loosened. Remove the ECM from the vehicle once the two electrical connectors have been removed. If the original ECM is not to be re-installed, wrap it in bubble-wrap and store it in a safe place. 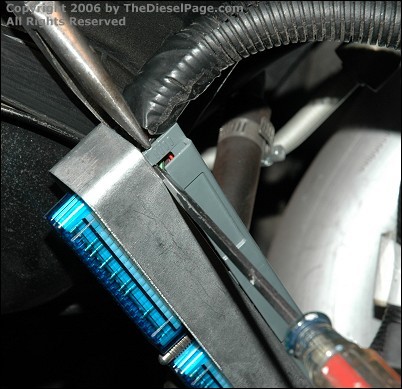 You'll need to remove the plastic cover on the back of the "blue" electrical connector. This was a bit tedious, but was accomplished by squeezing the two prongs where indicated in this photo while simultaneously applying upward pressure with a screwdriver blade on the body of the plastic cover. Repeat for all four corners. It's important not to damage the cover, as it helps to secure the harness. Notice the translucent blue cover over each pair of electrical pin groups. 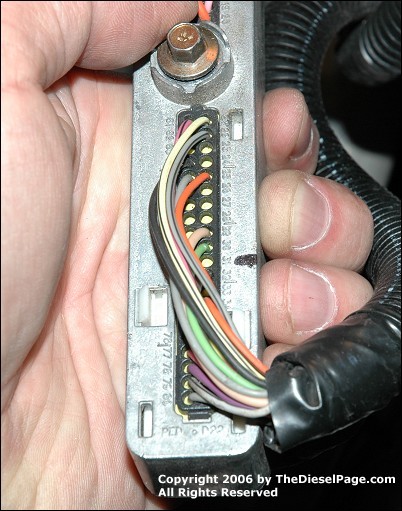 This photo shows the back-side of the "blue" connector. Locate and place a mark beside pin #31, as indicated. Coat a sharp tool with dielectric grease, like an awl or jewelers screwdriver, which is then used to pierce the yellow silicone rubber plug occupying the #31 location. 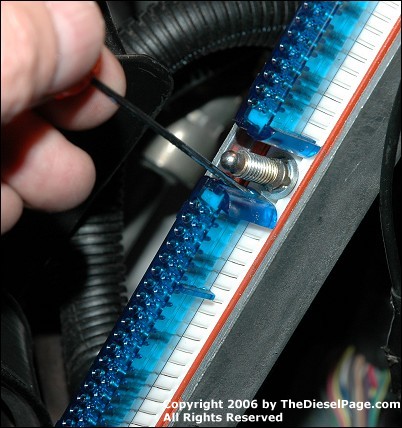 Remove the translucent blue pin cover by pressing the retainer clip on each end, as shown. The pin cover is easily removed and replaced. 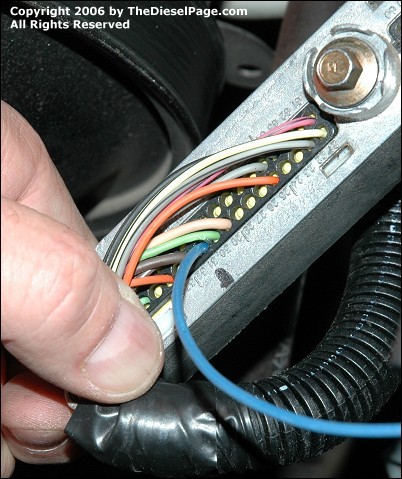 From inside the cab, run the ECM wire through the firewall. You may already have a grommet installed in the firewall to accommodate your EGT/Boost gauge wiring, or you can pierce the large firewall grommet beneath the brake booster. Either way, route the wire alongside the under hood junction block/fuse panel, and then to the ECM connector C1 (blue). Once at the rear of the ECM connector, push the new electrical pin through the pierced yellow plug on the back side of the electrical connector and into the pin block till you hear a click, indicating the pin has snapped into position. It's relatively easy. The dielectric grease helps the new pin/wire slide into place. 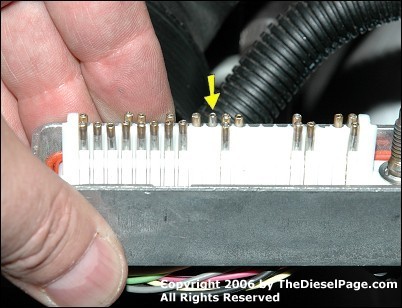 The new pin is pointed to in this photo. Ensure the new pin matches the height of the others alongside it, and that none of the other pins have been disturbed in the process. Once satisfied, snap the blue cover back into place over the pin group. 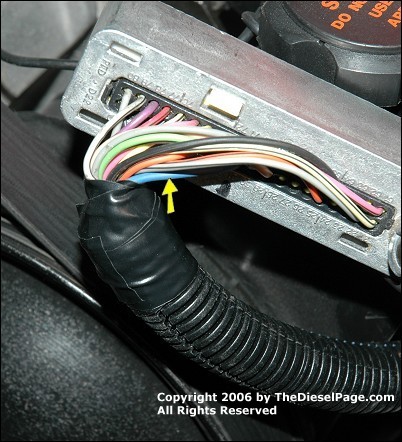 Unwrap the tape securing the end of the wiring loom. You'll want to insert your new ECM wire into the harness, and use the existing loom to protect it from abrasion or damage. This photo shows that the new wire has been added to the wiring loom (blue wire pointed to in photo), and that the plastic loom has been re-taped. This process will follow all the way back to the firewall. Not only will the wiring be protected, but it'll also produce an OEM appearance. You should avoid creating a tangle of wiring that not only looks bad but also creates multiple opportunities for problems to occur in the future. Once the new wire has been secured in the loom, snap the gray plastic connector cover back into place over the wiring loom. 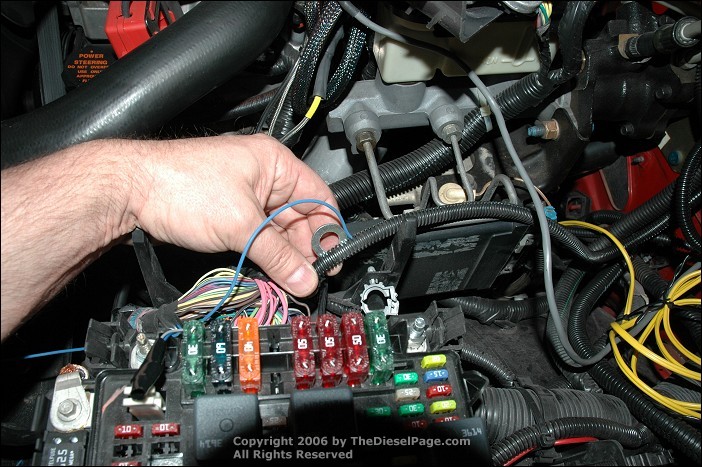 I had removed the electrical center cover to allow routing the wire through an existing loom. This process began at the firewall and concluded at the ECM connector C1 - using an existing black plastic corrugated wiring loom. Here, I'm using a washer, about the size of a quarter to roll the new wire into the loom. Once the new wire has been secured in place, you can reverse the disassembly process shown earlier, and install the new KD reprogrammed ECM, your original TCM and electrical center cover. You're now finished under the hood. 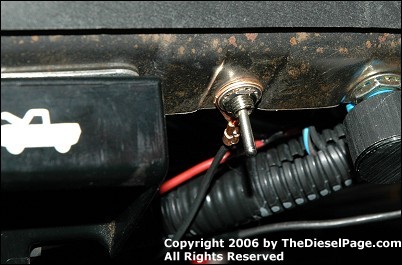 Inside the cab, the new switch was mounted in an existing hole on the bottom rim of the dash. This is a grounded metal rim, which allows placing the grounding eyelet (attached to the switch) under the nut that secures the switch to the dash. When the switch toggle is pressed toward the key notch of the switch (down), it applies a ground to pin C1-31 of the ECM, which enables the base tune. When toggled in the other position (up), the switch removes the ground, which enables the secondary tune. In addition to pin C1-31 used here to toggle between two different tunes, pin C1-71 can be used for a switch-selectable high-idle in an LB7 Duramax equipped truck. In addition, Kennedy Diesel has indicated that C1-39 can be utilized as a programmable output to control a variety of auxiliary systems - such as provide a turn on/off signal based on a boost pressure preset (i.e. control a nitrous relay), or a turn on/off signal based on a throttle position (TPS), or a turn on/off signal based on engine coolant temperature (i.e. control electric cooling fans), or a turn on/off signal based on engine torque value (i.e. to enable/disable torque reduction, which can be used to control nitrous injection at each shift point). There are many additional options not listed here for C1-39. Duramax owners have a number of options when acquiring a custom tuned ECM. You can send your existing ECM to KD or buy a "core" ECM either on the salvage market or through KD to have programmed. Keeping the original ECM might be a good idea, even though acquiring a second ECM will cost you a bit more. Keeping the original ECM will allow you to swap it back into the truck before you sell or trade the vehicle, or it might become useful should your truck require a trip to the dealer. However, the new KD ECM maintains the full gamut of diagnostic features offered by the stock ECM, and you'll still be able to use an aftermarket tuner or Tech II scan tool to read/reset trouble codes, or perform other real-time diagnostics. Custom ECM tuning expands the range and scope of possibilities for the Duramax 6600 that goes well beyond those offered by a more traditional programmer or performance module. Perhaps the best part is that the truck owner has more control over the programming changes. I expect tunes that increase fuel economy could become as popular as those that increase performance. TDP If you haven't already registered for our Bulletin Board Forum, please do. Once registered, please visit our BB for more discussion regarding Duramax Diesel Performance & Fuel Economy. Sources: ATS Diesel PerformanceCall: 1-800-949-6002 www.atsdiesel.com
Kennedy Diesel
What's New: | Feature Articles: | Product Reviews: | Member's Area: Join Us: | Duramax Diesel Page: | Advertisers: | Classified Ads: | Books:
Send e-mail to: turbo@TheDieselPage.com |
