|
the Duramax ECM Part II - LLY Duramax
By Todd Smith & TDP In addition to the 2001-2004 LB7 Duramax, Kennedy Diesel (KD) also offers custom ECM tunes for the 2004.5-2005 LLY Duramax Diesel. One of the best features of the KD tunes is that the ECM can be programmed with two tunes at the same time. The driver can then switch between the two on the fly. Some might opt for a miserly fuel economy tune in combination with a towing tune, or if competition is in your future - a 100 hp "daily driver" tune and a 250 hp track tune. KD has spent a considerable amount of time creating a variety of tunes that can be tailored to just about any application or owner expectation, which makes it easier for those owners who would rather drive their truck than spend the time necessary to dial-in a custom tune on their own. For this install, I chose to test a fuel economy tune as well as a 100 hp sport/towing tune for my 2005 GMC. Follow along as we install a KD custom-tuned ECM and switch assembly for the LLY Duramax.  A switch gives the driver the option of switching between two different tunes stored in the ECM. The included switch and wiring come pre-assembled with two ECM wires, one matching an LB7 and the other an LLY ECM electrical connector. Depending on what version Duramax you have, simply snip off the other wire somewhere close to the switch. The switch also includes a ground eyelet that can be connected to a grounded metal surface. Toggling the switch simply applies or removes a ground to the ECM black connector C2 pin-1. We'll show you how to insert the new pin and wire into the electrical connector, as well as how to remove and replace the ECM.  The LLY ECM incorporates three large electrical connectors, which are identified as blue (C1), black (C2) and gray (C3). The pictured ECM is the original, another was supplied by KD, allowing us to keep the truck's original ECM.  Begin by unbolting the negative battery terminal from both batteries. An 8mm or 5/16" wrench can be used to loosen/remove the battery cable.  Remove the plastic cover from the ECM enclosure. Depress the plastic latches on the cover to release it from the ECM enclosure  Shown on the left are the three ECM connectors. Top is blue (C1), middle is black (C2), and bottom is gray (C3). Remove the three ECM connectors by depressing each cover in the location shown. 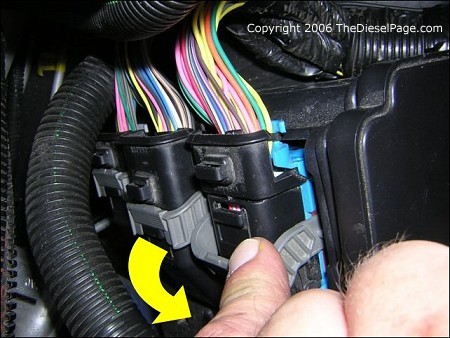 Now rotate each gray connector lever to unlock the connector from the ECM. Rock each ECM connector lightly back and forth to remove it from the ECM. Remove the ECM from the vehicle once the three electrical connectors have been removed. If the original ECM is not to be re-installed, wrap it in bubble-wrap and store it in a safe place.  Now you'll need to remove the black plastic cover on the back of the "black" electrical connector. Insert a screwdriver as shown on each side of the cover as shown to release it. Rotate the gray lever back down, and rotate the black cover up and out of the connector.  Remove the pin lock from the black connector as shown.  Remove the blue pin filler from the unoccupied pin-1 location found on the rear side of the black connector (C2), as shown at left.  From inside the cab, run the ECM wire through the firewall. You may already have a grommet installed in the firewall to accommodate your EGT/Boost gauge wiring as shown at the left, or you can pierce the large firewall grommet beneath the brake booster. Either way, route the wire alongside the under hood junction block/fuse panel, and then to the ECM black connector (C2).  Once at the rear of the ECM connector, push the new electrical pin through the hole in position #1 on the black ECM connector (C2) and into the pin block till you hear a click, indicating the pin has snapped into position. It's relatively easy. Application of some dielectric grease helps the new pin/wire slide into place. Make sure the new pin matches the height of the others alongside it, and that none of the other pins have been disturbed in the process. Once satisfied, snap the black cover back into place over the pin group.  Reinstall the pin lock as shown at the left. Unwrap the tape securing the end of the wiring loom. You'll want to insert your new ECM wire into the harness, and use the existing loom to protect it from abrasion or damage. Once the new wire is added to the wiring loom, re-tape the plastic loom. I ran the wire up to the fuse/relay center, then ran the new wire in its own loom back to the firewall. Not only will the wiring be protected, but it'll also produce an OEM appearance. You should avoid creating a tangle of wiring that not only looks bad but also creates opportunities for future problems to occur. Once the new wire has been secured in place, you can reverse the disassembly process shown earlier, and install the new KD reprogrammed ECM, ECM connectors, and ECM cover. You're now finished under the hood.  Inside the cab, the new switch was mounted in a 15/64" hole on the bottom rim of the dash. I attached the grounding eyelet (attached to the switch) under a nut behind the diagnostic connector. When the switch toggle is pressed away from the key notch of the switch (left), it applies a ground to pin C2-1 of the ECM, which enables the base tune. When toggled in the other position (up), the switch removes the ground, which enables the secondary tune. In addition to pin C2-1 used here to toggle between two different tunes, Kennedy Diesel has indicated that C1-27 can be utilized as a programmable output to control a variety of auxiliary systems as discussed previously in the LB7 article. I was previously averaging 18.5 mpg running 265-75R-16 tires with the stock ECM tuning. With the KD economy tune, I am now averaging 20 mpg with a mix of city/highway/expressway driving. TDP If you haven't already registered for our Bulletin Board Forum, please do. Once registered, please visit our BB for more discussion regarding Duramax Diesel Performance & Fuel Economy. Source: Kennedy DieselCall: 715-255-9433 Fax 715-255-9499 www.KennedyDiesel.com
What's New: | Feature Articles: | Product Reviews: | Member's Area: Join Us: | Duramax Diesel Page: | Advertisers: | Classified Ads: | Books:
Send e-mail to: turbo@TheDieselPage.com |
