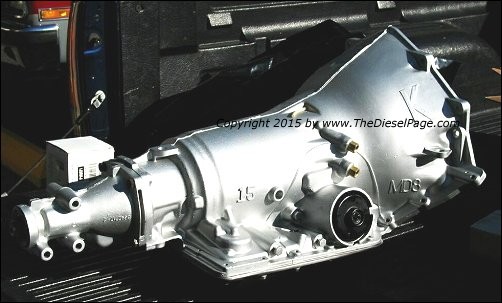
 Performance 700R4 By Dr. Lee Swanger TDP Member #0006 Last month we introduced you to the General Motors 700R4 transmission, also known as the 4L60 and 4L60E electronic transmission that came later. This month, we will review my adventure in commissioning a custom 700R4 to go behind my healthy naturally aspirated, or Swanger Avant Aspirated (SAA), custom diesel engine in my 1984 C-10 pickup, by answering some important questions in more detail. Who to Choose? I wanted to find a specialist close to Miami that could build a transmission for my truck, and explain to me, for the benefit of all of us, what is required in a good 700R4. My search brought me to Fourth Gear Inc. of Orlando, Florida. Visit them at www.fourthgearinc.com. Fourth Gear Inc. has found a market in street rods and in pre-1984 Corvettes, replacing the 2-speed Powerglide (!) transmissions that Chevy put in those American Sports Cars. I talked with the owner and head wrench of Fourth Gear Inc., Don Marcone, and he convinced me that he could build exactly what I wanted, and at a price that was very competitive. Currently Don charges $1145 for an upgraded 700R4, including a standard duty torque converter. After discussing my needs and additional upgrades, I sent Don a deposit, and a letter with my specifications. A couple weeks later I was in Orlando to visit the shop and have my tired old '84 tranny replaced by a fresh Fourth Gear Inc. remanufactured transmission. Don is a Florida Native with over 25 years experience in the automatic transmission business. He had worked for some of the larger transmission shops in Miami and Orlando, and then went into business for himself, opening and operating a medium size transmission shop doing the entire spectrum of transmission work. The daily grind of total responsibility to lots of customers and a large group of employees finally burned Don out, and he sold the shop. Keeping his finger in the automotive arena, Don got into the Street Rod hobby, where he soon discovered that no one in the Southeast United States was supplying good automatic transmissions for street rods. He had no choice but to start a business in a shop behind his new house located outside Orlando. Knowing that a properly built 700R4 was about the perfect transmission for a street rod, and that it bolts right up to both a Mouse Motor and a Rat Motor, Don restricted himself to that transmission, and called his business Fourth Gear Inc. He builds every transmission himself, and employs just one helper. But what a helper he is! Ron is a retired tool and die maker from Upstate New York, and complements Don perfectly, particularly in improving equipment and techniques for transmission rebuilding. Don's major business is still with the 700R4, but he also builds Chrysler A518 overdrive transmissions for the MOPAR crowd, and has recently branched out to rebuild the General Motors 4L60E modern electronic version of the 700R4. Where to Start - Which Core is Best? For his 700R4 rebuilds, Don uses only newer cores (1988 thru 1992), which have the auxiliary valve body and many GM upgrades already incorporated. 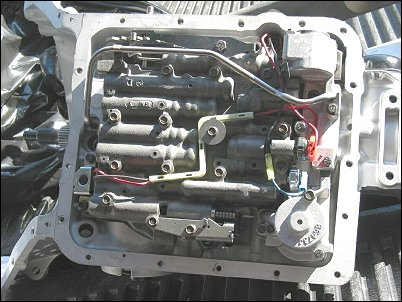
The small auxiliary valve body is to the right of the main valve body in this photo. Don waited to compare my transmission to the one he built before installing the internal wiring harness. There are about 47 different ways the 700R4 was wired internally for different applications, and we wanted to be sure we used the exact correct one for my truck. What is important??? Don has learned that automatic transmission fluid (ATF) pressure and ATF supply are key to improving 700R4 performance and durability. Keeping the ATF cool is also important, so Don recommends that we use the largest cooler that will fit, or make a big one fit. But also important is the right combination of hard parts, including the case and the internals to make a strong and reliable 700R4. The base-line upgraded transmission that Don supplies is capable of handling 450 horsepower and 450 foot-pounds of torque input from the motor. But as we shall see, there are some optional internal parts that will raise that capacity substantially. 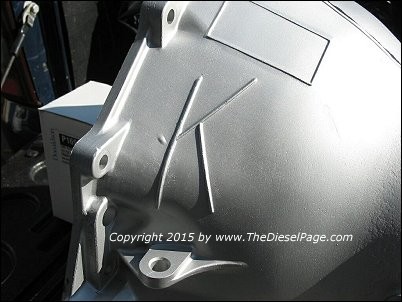
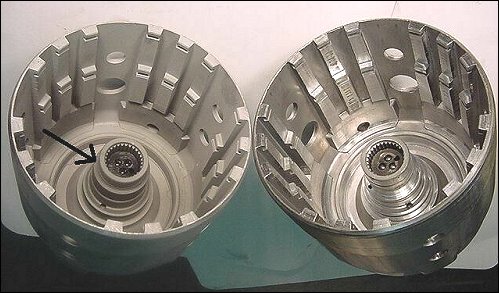
Since I warned Don that I had the original prototype SAA engine and was going to be adding Nitrous, he supplied the heavier, stronger "K" case from a four-wheel drive truck for my transmission. The K case is easy to recognize: it has a large letter K cast into each side of the bell housing, and it has tapped holes for 10 mm bolts to hold the cast torque converter bottom cover in place. For my 2WD application, Don drilled holes for the self-tapping screws that hold the 2WD sheet steel torque converter bottom cover in place. The real K case with ears intact for the dust shield is not always in stock, and will cost extra if Don does not have a lot of them in inventory.
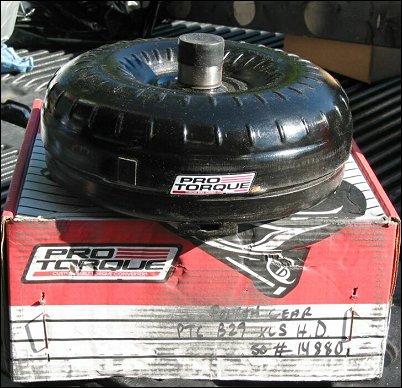
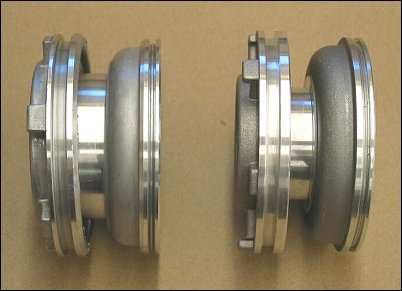
And Which Torque Converter for The Clevite Kid? ProTorque (on the web at www.protorque.com/) has been building specialized torque converters in New York for 35 years. They were an early supplier of heavy-duty torque converters for all diesel applications, and Don and I requested one with a stall speed of about 1500-1800 rpm for my application. Since I don't tow heavy loads long distances, was more interested in acceleration and fun driving, and since the SAA engine is a powerhouse compared to the average NA diesel, we wanted a 1500-1800 rpm stall speed, which is right in between ProTorque's standard diesel torque converter (1200-1500 rpm stall) and their heavy duty model for gasoline engine trucks (1800-2100 rpm stall). Joe Rivera at ProTorque was very helpful in creating this custom torque converter for my application. This follows traditional hot-rod practice of using a higher stall speed torque converter for a lighter vehicle with more gear in the axle, and a hot engine that develops torque at a higher rpm. Well, that describes the SAA engine in my little red truck! My torque peak is probably closer to 2400 rpm, versus 1800 rpm for GM diesels that are closer to stock, so the slight but meaningful increase in stall speed in my special-order ProTorque converter is just what the doctor (Dr. Lee) ordered. For most applications, including towing or hauling heavy loads, the lower stall speed converters, in the 1200 to 1500 rpm range, are the best choice for diesel truck torque converters. This is typically called an RV or Towing torque converter. The lower stall speed means a tighter connection between the engine and the axle, for more efficiency and less heat generation. It also better matches the limited rpm range of the diesel, and the torque peak at a lower rpm is better suited to the lower stall speed. In addition, hauling heavy loads increases the demand for torque, and requires a tighter (lower stall speed) torque converter. 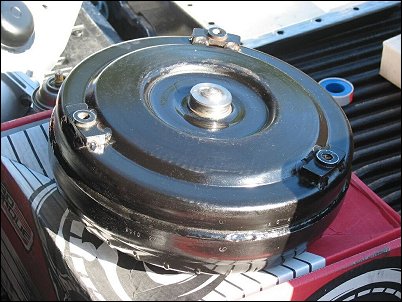
Yes, there are only three lugs on this converter, but it IS a diesel converter. GM has recently changed its diesel torque converters for the 6.2L and 6.5L engines to three lugs, but with a healthy reinforcing block at each lug location. From a torque-transmission perspective, one lug and one bolt would be sufficient for even a good 6.5LTD, but balance would be difficult to achieve! The ProTorque converters also feature furnace brazed fins, Torrington thrust bearings, ceramic carbon impregnated clutches, hardened billet splines, hardened pump drives, and computer balancing of the assemblies. They are excellent choices for all sorts of modified and upgraded engines and transmissions. Always install your torque converter using clean bolts, thread locking compound and proper bolt torque to ensure a troublefree installation. 
Which Internal Parts are Upgraded? There are three versions of the input drum and shaft shown here: 1984 (left), heavier, stonger 1988-92 (right) and strongest heat-treated and reinforced TorqueDrive (center).
The optional (extra cost) TorqueDrive input shell I specified (left) has a reinforced center bearing support to strengthen this critical location. The heat treatment to harden and strengthen the shell has left a matte finish in place of the shinier as-machined surface on the stock GM input shell on the right.
I selected the TorqueDrive, for compatibility with future engine upgrades, and Don loaded it with the 3-4 clutch pack.
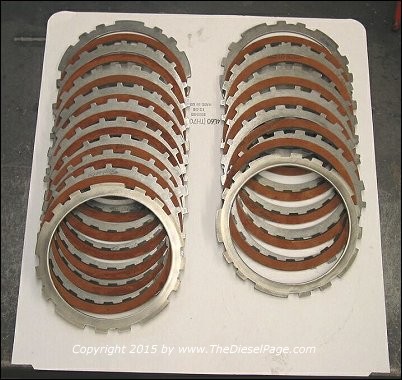
Clutches and bands are not as critical, but they are easier to understand, and some have cool names like Kolene steels and Alto Red clutch plates. All of the name brands, like Raybestos and Borg-Warner are good and will work and last if applied with enough oil pressure. For my transmission Don installed Borg-Warner clutch discs and Kolene steels. On the right of this image we see the standard complement of six clutches and seven steels in the 3-4 clutch pack, whereas on the left is the upgraded pack with nine clutches and ten steels, which increases the friction area by 50%, and reduces the stress on each surface.
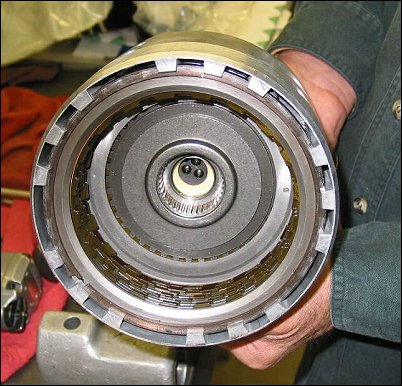
The Corvette servo (on the right side in the image) has a larger net area for apply the 2-4 band. This is most important on the 1-2 shift. For the 2-3 shift, this servo must release quickly and completely to avoid excess wear and to cause a quick, positive shift. The stock servo that this replaces is on the left. There are billet servos available that have even more net area than the Corvette servo, but most 700R4 specialists agree that for all but hard-core drag racing, the Corvette servo is more than adequate.
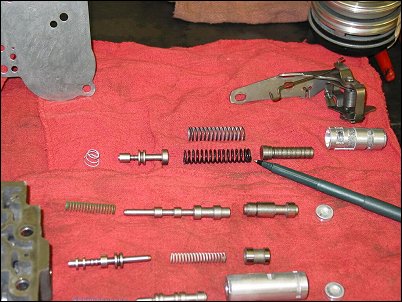
This photo shows some of the valve spools, springs, and sleeves from the valve body, as well as the Throttle Valve (TV) components above my pen (on the right side of this image). The pen is pointing at a stiffer, longer TV spring that replaces the light blue one above it, to make the TV more responsive to throttle position. Like many of the parts Don includes, this spring is one of the components from a Superior Transmission Parts, Inc. shift kit. For most 700R4 buildups, he uses their Shift Technology Products 700R4 Kit, part no. 779085. This includes replacement springs and check balls that can improve the pressure rise to help minimize burned clutches and bands, raise the speed at which lockup of the torque converter occurs to improve driveability, and eliminate the flare on the 1-2 shift and the 2-3 shift, like I had been experiencing in my original transmission. 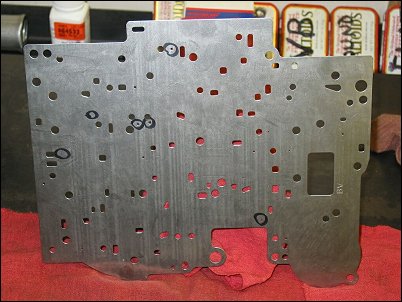
The valve body plate is modified by enlarging five holes and adding one (black circles) to increase ATF flow and responsiveness of the transmission for faster shifts. Many shift kits include instructions for modifying the valve body plate, which goes between the transmission case and the valve body, but Don's experience and understanding of the transmission and its function allows him to customize each modification depending on the intended application.
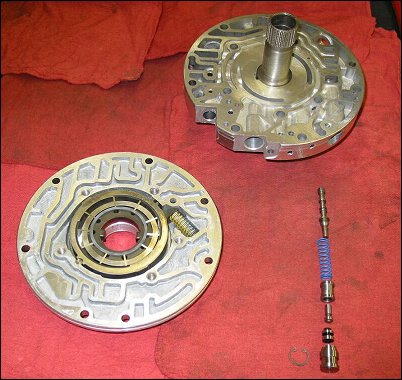
Which Front Pump for a Diesel Transmission? The front pump is where the pressure is developed to make the transmission operate. There have been seven-vane, 10-vane, and 13-vane versions. The seven-vane is obsolete, and no reputable builder would install it. Both the 10-vane and 13-vane versions are excellent. The only difference is that the 13-vane version is quieter. Since my SAA diesel engine makes its presence known in an audible manner, the 13-vane would have been wasted on it. Of equal importance is the eccentric control for the pump, whose components are shown on the right. This sets the pressure output of the pump, and gets new components to make it more responsive. The Pressure Control Valve is upgraded to 0.500 inches in all the transmissions Don builds for quicker response to changing conditions in a rapidly accelerating vehicle. Some builders take a light cut across the surface of the pump body in an attempt to get a flat surface. I asked Don if he does this also, and he answered as follows: "The question of machining the pump face is something we DO NOT do. We just do not want to take any chances with re-machined items. We believe there are too many edges and surfaces to de-burr effectively after machining is done. If the pump faces we are working with have a slight mark or imperfection, we throw them out. We do polish all the acceptable ones with 3M Scotch Brite and then check them for flatness with a steel straight edge." 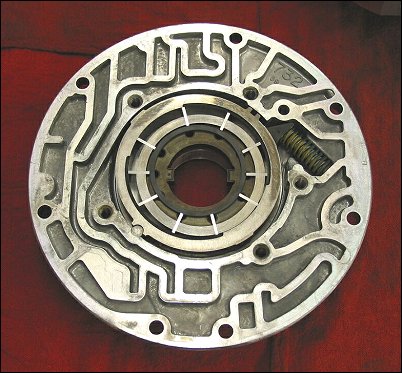
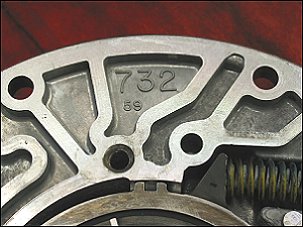 Those are a lot of edges to de-burr! For those of you who DO want to try all of this at home, Don suggests that you only use the "732" pump casting, which you can recognize with the help of this close-up of the pump body:
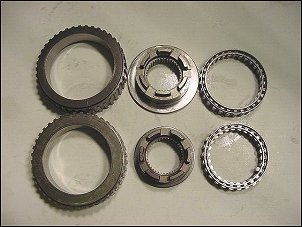
Parts and More Parts . . . Another area that is improved is the input sprag clutch assembly. The early 26-element assembly unit on the bottom is replaced with the set of later 29-element components on the top. More elements and larger sizes increase strength and torque capacity.
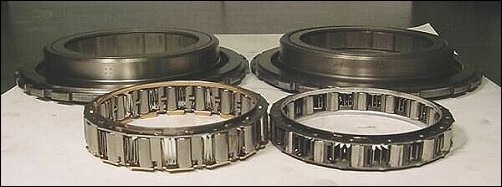
The rear sprag clutch is also upgraded from the smaller, weaker original early parts on the right to the later GM parts with stronger components, a larger number of longer rollers, and a thicker low/reverse support on the left. Again, this increases the durability and the torque-handling capability of the upgraded transmission.
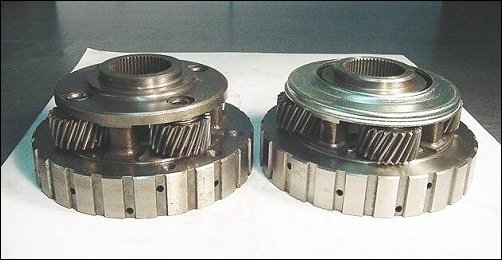
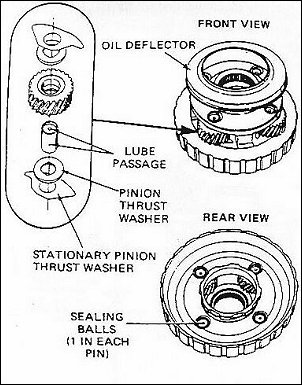
The early version of the rear carrier and planetary gears on the left are replaced with the superior upgraded version on the right. Early bronze washers that had a tendency to wear and fall out are replaced with "bat wing" washers, and an oil slinger has been added for better oil control. The sketch that follows shows these improvements.
The sungear drive shell is also upgraded.
On the left is a stock sungear drive shell that has failed at the attachment of the spline to the shell. The stock GM replacement part, with a nylon washer, is shown on the right. In the middle, the reinforced, stronger TorqueDrive sungear drive shell is shown, with a thrust bearing in place of the nylon washer. I selected the optional (extra cost) TorqueDrive shell, which along with the TorqueDrive input drum and shaft raises the capabilities of this transmission to well over 500 horsepower and 500 foot-pounds of torque, plenty for any foreseeable 6.2L or 6.5L diesel, turbocharged or otherwise. So, Dr. Lee, How Well Does it Work? Fourth Gear Inc. is strictly a transmission rebuild shop, and Don does not do installations, so when I drove my 1984 Chevy pickup to Orlando, we went to his friend Ken's shop for the installation, and a fill of Amsoil Synthetic ATF. Don and I went back to his shop for show-and-tell, and shoot the photos you see here. When we came back to the installation shop, and Don asked the owner how my truck performed, Ken said "about the same as my Ford." Well, Ken's Ford is a Powerstroke with a 4" exhaust and a 75 HP chip !! Don and I went for a drive, Don tweaked the TV cable adjustment (he is an expert, he can do this!) and I was on my way home to Miami, with firm, crisp shifts, just like you read about in the magazines. My truck already has a 24,000 lb. auxiliary ATF cooler installed after the in-radiator cooler, and I have been using an external transmission filter for about 6 years. Since my tranny did not have any serious problems before the change-out, a quick flush of my transmission cooler lines was all that was required. For a situation where a dead tranny is being replaced, the cooler should be removed, if possible, and thoroughly cleaned out to prevent and debris from getting back into the new transmission. Don Marcone's recommendation for the TCC lockup function, in person and on his Web site is: "We strongly recommend an on/off switch in the system to give the option to have 4th speed driving capability, without lock-up for stop-and-go and around-town driving." My experience since adding such a switch to my truck is to heartily endorse this modification. The instant response as the torque converter multiplies the torque in fourth gear at 40 or 45 mph when I touch the accelerator pedal is most rewarding. Following Don's advice, I am now running with the electrical system set up to automatically engage the TCC in 4th gear, disengage when the brake pedal is tapped, and be over-ridden by the recommended dash-mounted rocker switch to disable the TCC lockup. I also have a separate dash-mounted rocker switch to force TCC lockup in third gear for heavy load hauling. Remember, for any heavy-duty hauling or towing, the TCC lockup should ALWAYS be used to minimize transmission temperature build-up. My truck has plenty of cooling capacity for the transmission, but I am currently adding a transmission temperature gauge to monitor the tranny while running unlocked, just to be sure. 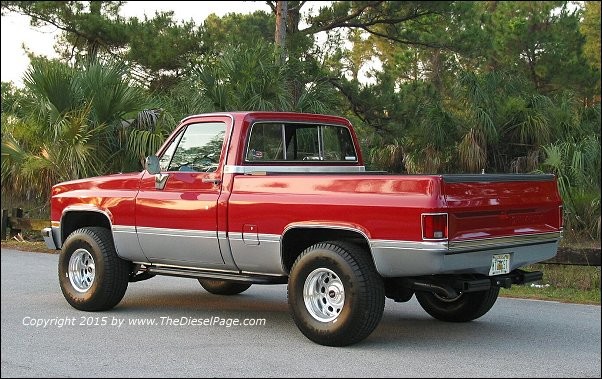 On the Saturday after Thanksgiving it was finally cool enough in Miami (58�F) to do some zero-to-60 mph runs with denser air for better performance. I took all the extraneous weight (tool boxes, AC inverter, flashlight, spare oil, spare DEXCOOL, jumper cables, etc.) out of the truck and at 7 a.m. I was on my way to the secret stretch of road where the 2 Fast, 2 Furious Rice Rocket crowd races on Friday and Saturday nights. The last time I ran for the record, it was shortly after the SAA engine had been installed, and I ran 0-60 in 9.52 seconds, with sloppy up-shifts, particularly on the 2-3 shift. Since then I have turned up the DB2 pump another 1/6 turn, and the engine has been further broken in for peak performance. After a few runs to warm up the rear tires, and to practice holding back on the accelerator pedal to control wheelspin, it was time to see if the transmission upgrade affected 0-60 mph performance. The trusty G-tech performance meter quietly blinked the result: 0-60 in 8.98 seconds. Woo-hoo, I have a sub-9-second truck !! I've said it before, but I'll say it again: "We don' need no steeeeenkin' Turbo!" I want to express my appreciation to Don Marcone and his assistant Ron of Fourth Gear Inc. for a great transmission, and for taking the time to share their knowledge with me, to Joe Rivera of ProTorque for making me a one-off torque converter at his standard price, and to all three gentlemen for taking another � second off my 0-60 times. TDP Lee SwangerTDP Member # 0006 Addendum 10/30/04 - Notice concerning the use of "Torque Drive" high strength input shaft-drum assemblies in 700R4 transmissions. The rebuilt transmission I bought from Fourth Gear Inc. in Orlando, Florida, developed a slipping lock-up torque converter clutch (TCC) after only about 5000 miles of operation. The TCC would lock up on a level highway, but began to slip when more power was required, like climbing a grade. Using my lockup switch on the dash, I determined that there was some torque being transmitted by the TCC, but the rpm had to rise above lock-up rpm for the torque converter to deliver the rest of the torque required to pull the hill. I returned the truck to Fourth Gear Inc. for diagnosis, and Don Marcone, the owner, agreed to replace the transmission under warranty, and to replace the torque converter as well. When Don tore down the old transmission, he found that the input shaft from the Torque Drive shaft-drum assembly had worn out the front and rear bushings of the front pump in the transmission. The normal tight clearance between the front bushing and the shaft holds the pressure in the torque converter that applies the TCC, so opening up that clearance bled off the pressure and allowed my torque converter clutch to slip. Incidentally, every other component in the transmission looked like it had never been driven. Only these two bushings were worn. Don concluded, and as a bearing expert I concur, that the black coating on this particular Torque Drive shaft was rougher than the machined surface on the stock shaft, and that the roughness attacked the bushings. Now (and in my replacement transmission) Don polishes the journals on the input shaft to remove the rough black coating, in an effort to match or exceed the finish used on a stock GM input shaft. The unit in the middle of the photo, with the solid black input shaft, is the Torque Drive component. If you are considering specifying the Torque Drive components for a high performance transmission, be sure your builder knows how to correct any roughness that he might find on the input shaft. This information is also being added to the Product Review as an addendum. If you have downloaded the article for future reference, you may wish to go back to TheDieselPage.com to save the revised version, when it becomes available. Information Sources:
About the Author: Dr. Lee Swanger is a consulting engineer trained in mechanical engineering and metallurgy. Currently he is a principal engineer with a major engineering consulting firm, and a significant part of his work deals with large diesel engines in stationary power and marine propulsion. Prior to his current position, Lee was Director of Research and Development for Clevite Bearing Company, and received his engineering degrees from Case Institute of Technology in Cleveland, Ohio and Stanford University in Palo Alto, California. Lee is a Registered Professional Engineer in Ohio, California, Virginia and Florida. The opinions that Dr. Swanger expresses here are his alone, and may not be attributed to his past or present employers, or to The Diesel Page. What's New: | Feature Articles: | Product Reviews: | Member's Area: Join Us: | Duramax Diesel Page: | Advertisers: | Classified Ads: | Books:
Send e-mail to: turbo@TheDieselPage.com |
