
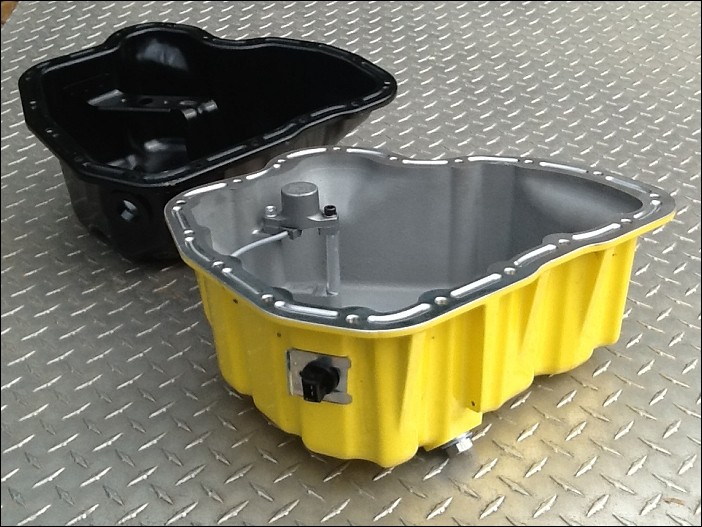
 Banana Pan Cast Aluminum Oil Pan for the Duramax 6600 By Todd Smith Cast aluminum differential and transmission pans have been popular products among diesel owners for many years, but the engine oil pan has been largely forgotten by the aftermarket. Till now. A new lower oil pan was introduced recently for the GM Duramax 6600 by www.Go-Truck-Yourself.com. The Banana Pan was developed to allow a complete oil drain when changing the engine oil and make it easy to add an oil pan heater. The design of the stamped-steel sheet-metal OEM oil pan prevents 1 or 2 cups of old oil from draining at the time of service. The Banana Pan changes all that. Let's have a look. 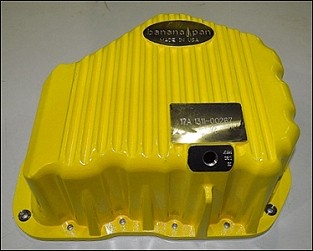 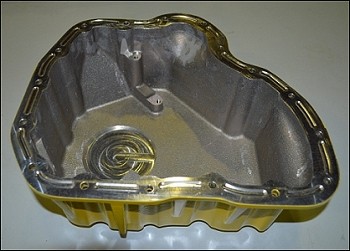 Shown here are top and bottom views of the new 356T6 cast aluminum Banana Pan. The pan is powder-coated yellow as standard, but it can be ordered with a black powder-coated finish or even left uncoated, so you can paint or powder-coat the pan in a color of your choice. The aluminum Banana Pan maintains provisions for the factory oil level sensor, and is available with pan heater options for owners living in cold climates. More information is available at the end of this review discussing some of the currently available heater options. 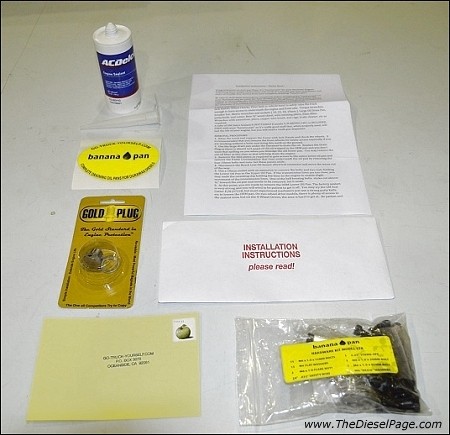
Also included:
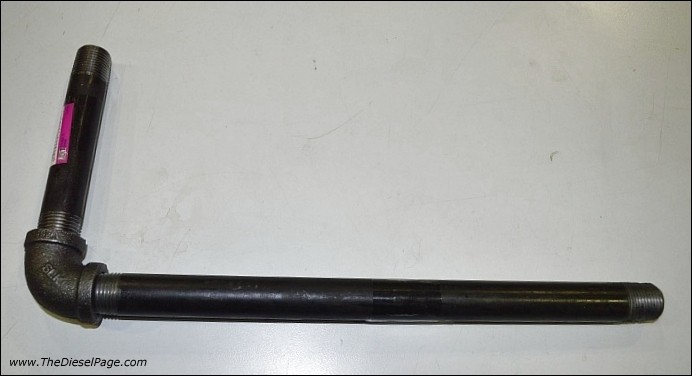 You can create a simple and inexpensive pry tool that will make removal of the stock oil pan much easier. This is a ½"npt 5 inch black pipe nipple, a ½" npt black pipe elbow, and a 10" black pipe nipple assembled as shown here. Wrap the 5 inch nipple with black tape to prevent the pipe from marring the original pan. Tools and supplies necessary for this job:
Here are the steps to installing the new Banana Pan:
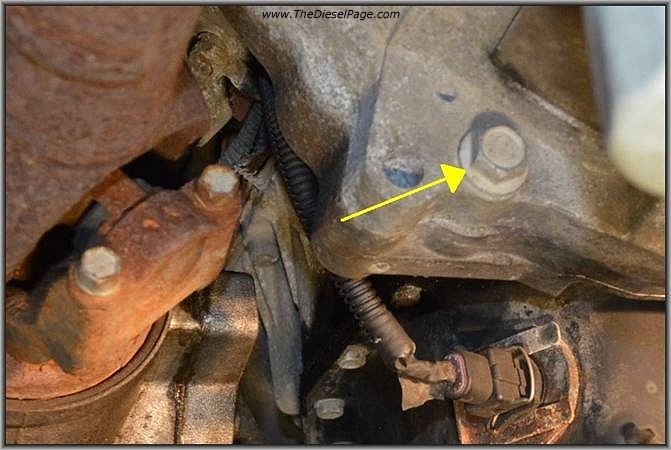 Remove the transmission bellhousing bolt pointed to in this photo using a 15mm end wrench or socket. Removing the bolt is necessary to provide clearance for oil pan removal and installation of the new Banana Pan. 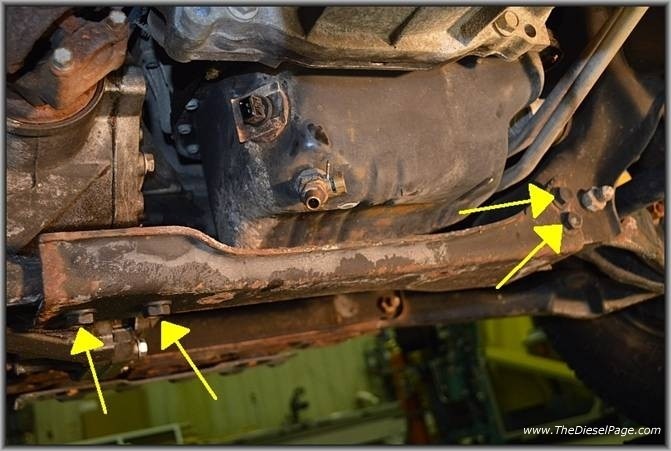 Remove the 4 cross member bolts using the 18mm wrench and socket/ratchet. 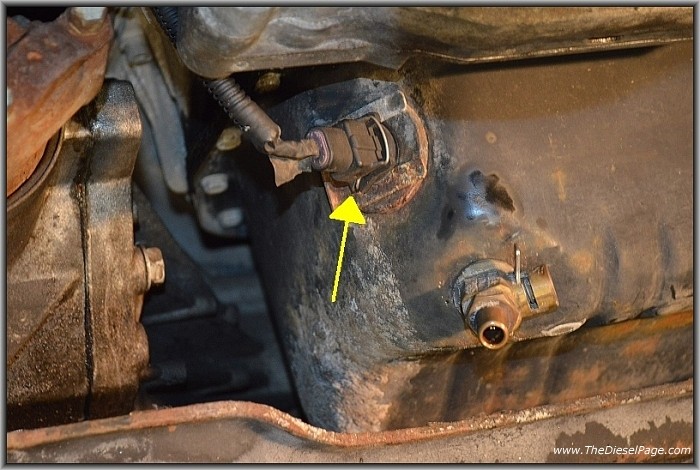 Unplug the Oil Level Sensor electrical connector and move it (or tie it) out of the way. 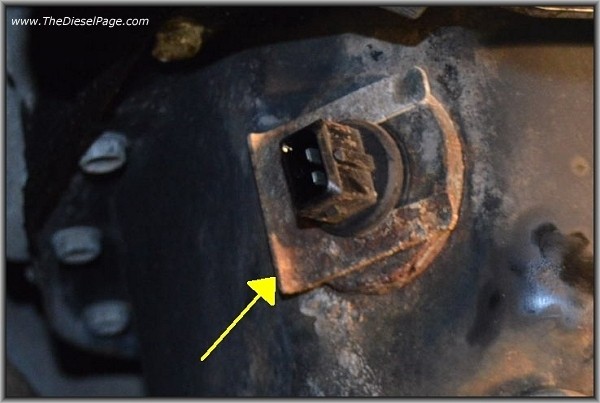 Remove the retaining clip for low oil level sensor. Save the clip for reuse later. Gently push the low oil sensor connector into the oil pan. 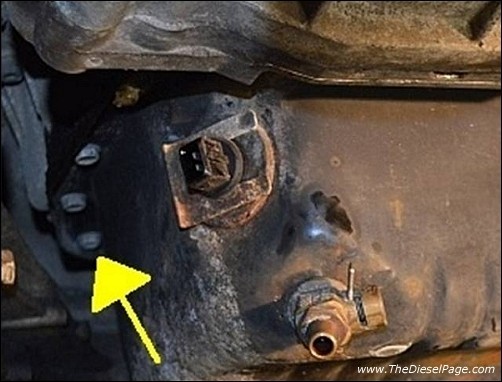 Remove the 15 bolts and 2 nuts securing the lower OEM oil pan using a 10mm end wrench and socket.  If the transmission cooler lines are in the way, you can move them slightly by removing the retaining nut on the transmission line support clip as shown here. Use a 10mm socket and ratchet to remove the nut from the clip. Slide the clip away from the engine. 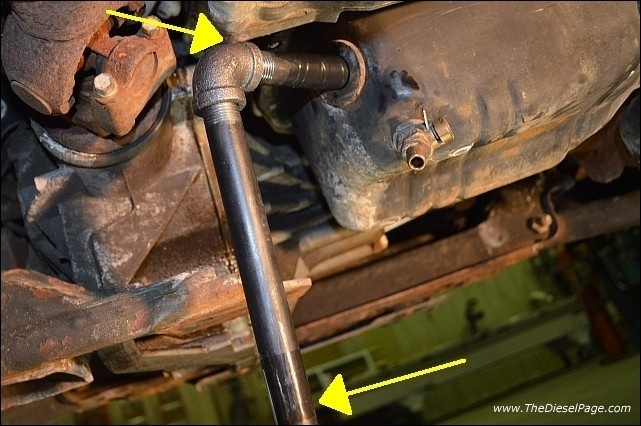 At this point the lower OEM oil pan can be removed. The factory sealant is very strong and patience is required to remove the lower pan. Consider using a seal cutter or putty knife to loosen the OEM pan, while being careful not to damage the aluminum crankcase that the pan is bolted to. The front differential found in four wheel drive models restricts access somewhat, so I constructed the "Pry Bar" discussed earlier to make the job easier. Using the ½" pipe removal tool shown earlier, insert the short end (wrapped with black tape) into the oil sensor hole on the oil pan. Use the location shown in the upper arrow as the pivot point. I used a rubber mallet to bump the lower end of the "handle" to pop the OEM pan loose from the engine. 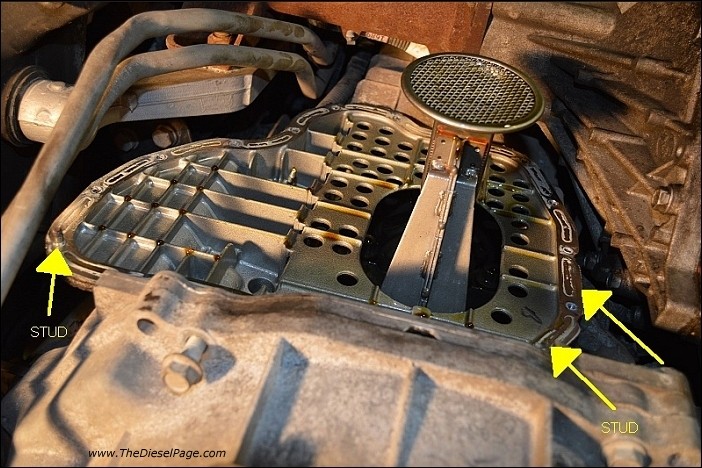 Carefully lower the pan once it pops loose so you don't spill the remaining oil that didn't drain. You'll notice that the pan still contains a cup or two of old engine oil. After the OEM pan has been removed, use the new ¾" wood chisel to carefully scrape the old gasket material from the upper oil pan. Be careful not to gouge the surface. Complete the cleaning by using the small wire brush and brake cleaner with a lint free rag to remove all traces of oil from the gasket surface. Note the stud locations. 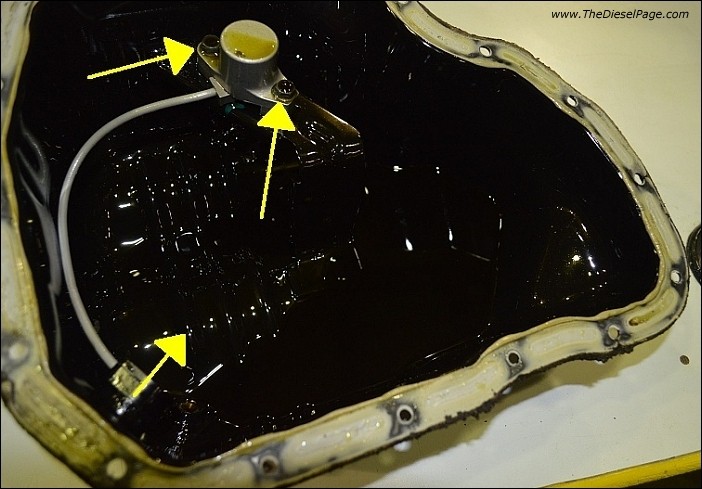 The original oil level sensor must now be removed from the old pan and transferred to the new Banana Pan. Install the oil level sensor into the new Banana Pan using the M6x25mm bolt, the M6x85mm bolt, aluminum 2.25" spacer, and the two "Heico" lock washers provided in the kit. 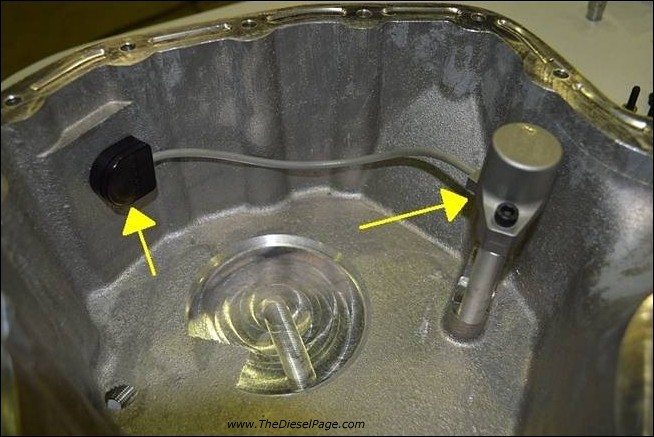 Lubricate the oil level sensor connector o-ring with a smear of engine oil and insert it into the pan's sensor connector hole (left side arrow in this photo). 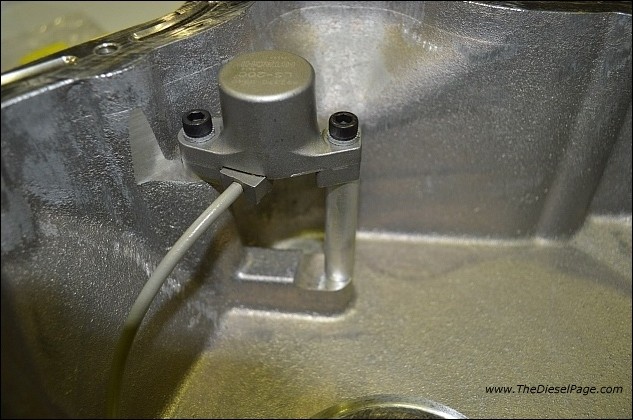 This is another view of the installed oil level sensor. 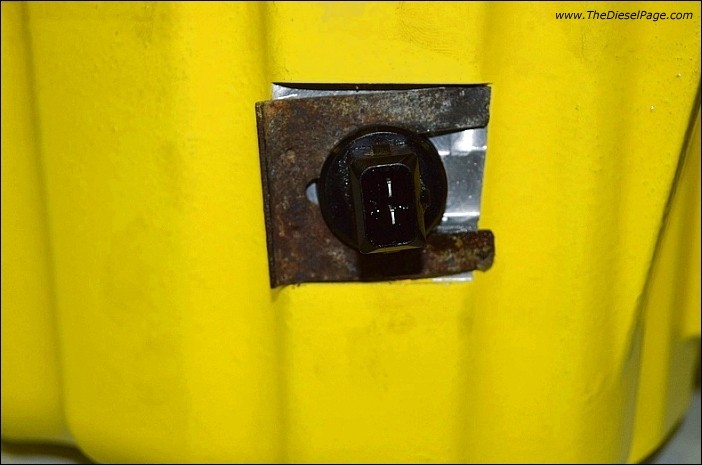 Install the retaining clip on the sensor electrical connector as shown above. 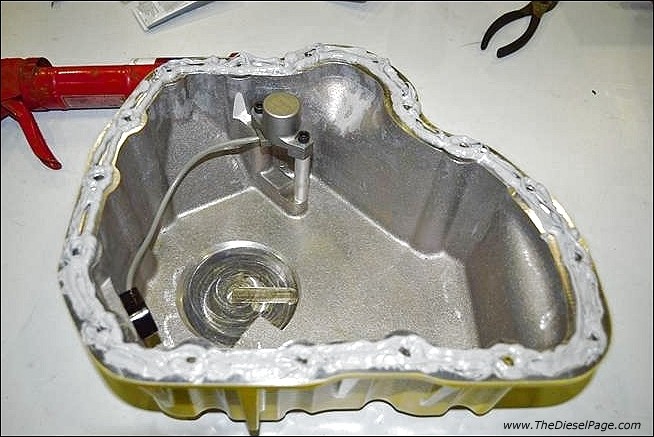 Before applying the sealant, trial fit the new Banana pan into position on the engine block. Again, there is less room to work in 4wd models, so you'll need to learn how to get the new pan into position without disturbing the oil pan sealant. Start by orienting the pan in the way it will be when installed and when you are facing the front of the truck, and then try turning the pan slightly clockwise and start at the right rear corner. Rotate the pan back straight, and then push it up toward the crankcase. The two threaded 6mm studs will help with pan orientation. Practice this a few times without sealant to gain confidence in your ability to do it quickly. When you are confident in your ability to install the new pan without disturbing the sealant, clean all gasket surfaces using brake cleaner and a lint free cloth. Arrange the new pan's Allen bolts/washers and nuts nearby for easy access. Apply the sealant (included) to the new oil pan in a 2-3mm wide bead as shown above. You want to surround the bolt holes with sealant and make ensure there are not thin spots in the sealant application. 
Do the turn/twist/push movement you learned earlier to get the new pan up against the engine. Install the hardware (15 new bolts/washers and 2 nuts supplied in the kit). A helper may be of assistance at this step of the installation. You only have a short time to install the pan and get the bolts/nuts installed before the sealant will begin to "skin". You want the pan to make contact with the crankcase while the sealant is still "wet" to allow for the best seal and to help prevent future leaks. Lightly tighten the bolts and nuts using your fingers. The threaded holes in the aluminum crankcase are easy to cross-thread if using tools to start the bolts. Tighten the fasteners in the order shown at the left. With each pass, tighten the fasteners a bit more. Torque the bolts and nuts to 89 inch/lbs using a torque wrench.
 IMPORTANT: Allow the sealant to cure for 12 to 24 hours before adding oil (24 hours is highly recommended). Put a note on the steering wheel indicating that the engine needs oil before starting. In the meantime, you can install a new engine oil filter and reconnect the electrical connector for the oil level sensor.
Hard to quantify, but after filling with oil and starting the engine the next day I noticed that the engine appears to be a bit quieter with the Banana Pan installed. Overall, the pan itself appears to be a quality product, and the included installation instructions and hardware package are nice additions. Yellow may not be the color for everyone, but there are choices - the pan is available in plain aluminum, which can be powder-coated by the end user in any color, or a buyer could contact the manufacturer about the availability of a black "Banana Pan". And finally, the available heater options make this a must-have for our brothers to the north. Questions and comments are welcome. Cold Weather Options: Pan heaters are now available for use in cold weather. Keeping the engine oil warm in extreme cold will allow for easier starts and less engine wear. Options for a stick on heater or a thread-in unit are now available. Thread-in unit is shown here: 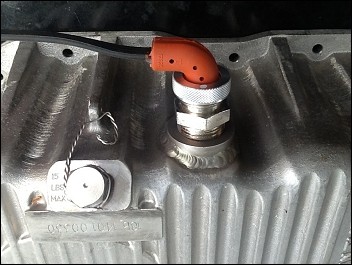 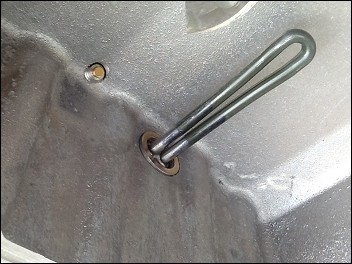 GO-TRUCK-YOURSELF.COM P.O. Box 3078 Oceanside, CA 92051 1-800-474-7538 What's New: | Feature Articles: | Product Reviews: | Member's Area: Join Us: | Duramax Diesel Page: | Advertisers: | Classified Ads: | Books:
Send e-mail to: turbo@TheDieselPage.com |
