|
When Certainty is Required By Jim Bigley The Diesel Page has always provided essential information that can be found nowhere else. This Tech Tips page adds to a very long-long list of essential information that we all need to get the most out of our GM diesel. I've been working toward completion of a 6.5L engine rebuild project these past few months, which had become stalled because of a need for a usable crankshaft. The engine's original and otherwise pristine crankshaft had been completely ruined by an idiot who didn't know how to correctly disassemble an engine, which, I suppose, is why the project had been dropped into my lap in the first place. As a consequence of solving this crankshaft problem, I've answered a few questions that no one on the Internet knew the answer to - at least none that Google could find. For example, with certainty, what is the damper bolt size and thread pitch? What is the configuration and number of the bypass valves used in the engine's lubrication system? How do you prepare a used crankshaft for service that is not 100% perfect, but is nowhere near needing a regrind or even a repolish? Again, certainty is required at times, and especially when rebuilding a 6.5L diesel. I'll answer these questions right here - with certainty. 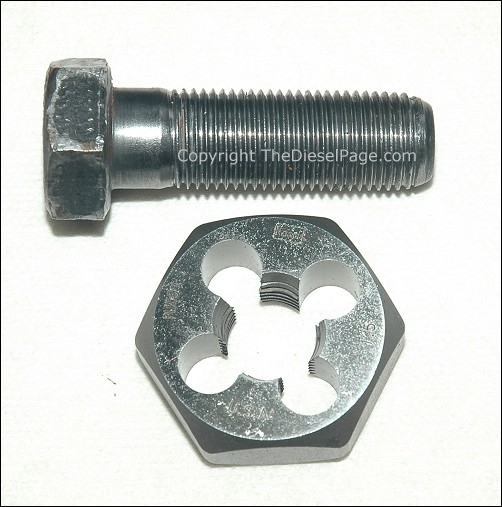 I had decided to make a damper/crank sprocket installer because I plan to use a Fluidampr on this engine. The Fluidampr can be hard to install because of the tight interference fit with the crankshaft, and beating the damper into place using a BFH scares me a little. Boiling the damper in water helps, but I wanted to create an installer using an old damper bolt and a 6" piece of all-thread rod I had on hand, sorta like the one Dr. Lee put together some years ago. A damper installer would result in more certainty in knowing that the damper could be installed without damaging either the crankshaft or damper bolt. A spare damper bolt is needed to produce a damper installer. Unfortunately, the spare damper bolt I had on hand had been damaged long ago by someone who tried to install a damper by using the bolt to press the damper onto the crank snout (wasn't me). The first few threads of the bolt had been damaged. Because I knew that a new bolt would be hard to locate I wanted to simply re-thread the old bolt - so it would easily thread into the new crankshaft. All I needed was a rethreading die. But, what size and thread pitch was the damper bolt? Apparently, no one on the Internet knew for certain, so I couldn't simply order a die from Amazon. To provide certainty, I drove to the nearest larger town, and enlisted the help of the tool experts at a dedicated tool store (all they do is sell high quality hand and power tools) to help determine what die I needed. Turns out, the 6.2L/6.5L damper bolt size and thread pitch is M16 x 1.50. The tool-steel made-in-the-U.S. rethreading die shown here cost me $13. Now I knew what the damper bolt size and thread pitch were, and knowing with certainty was worth both the expense and the time investment. When the time comes, I'll show you how I made a Dr. Lee damper installer and how I used it. 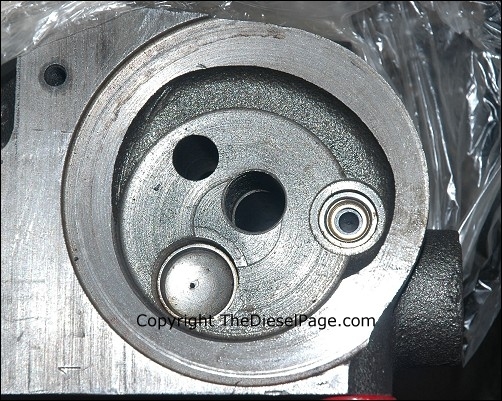 The 6.5L "599" block I'm working on had visited an engine shop sometime right before I acquired the parts. During the visit, the block had been chemically cleaned, and I needed to know whether any of the bypass valves in the oil filter area were missing. This is an important detail that would greatly complicate getting the '94 Blazer back on the road if I guessed wrong. I needed certainty about the number and condition of the oil bypass valves in this block. An extensive Google search failed to produce the certainty I needed. The first step in finding an answer to this lube system question was to open the GM books to view the oil flow schematic. I discovered that there are 2 oil bypass valves used in these engines - one bypass valve for the oil cooler and another bypass valve for the oil filter. If either would ever to become clogged and oil couldn't flow, the associated bypass valve would open to prevent a lubrication related engine failure. I could only see one bypass valve in the block, but the above diagram showed that the other bypass valve was located beneath the "cup plug". The cup plug has a .050" hole in it. I suppose the hole is there to both prevent an airlock and to allow probing for the second bypass valve. So, now I know for certain that the second bypass valve is indeed present and accounted for. 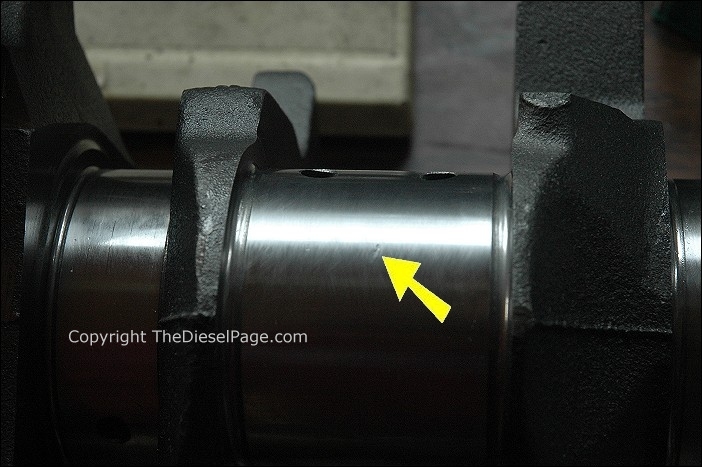 The crankshaft I recently acquired from a local engine rebuild shop was almost perfect - except for a nick on the rod journal shown here. Dr. Lee visited me recently, so while he was here I asked him to examine the nick and offer an opinion about my proposed fix. Dr. Lee mentioned that the nick was in the area between the rods, and should not present a problem once any burr had been removed. 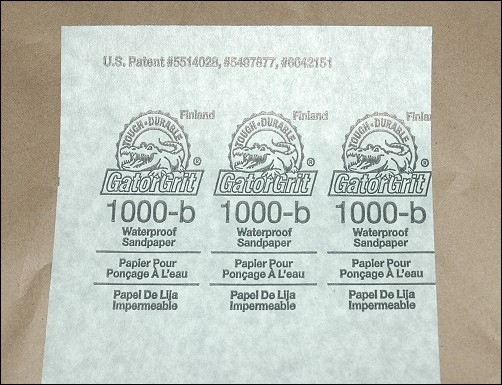 I had a selection of very fine wet/dry sandpaper on hand that ranged in grit size from 220 to 2000 (1000 shown) that I had acquired from NAPA. For a simple polish on a crankshaft or camshaft journal, I tend to favor the 1000 grit when used wet with WD-40. 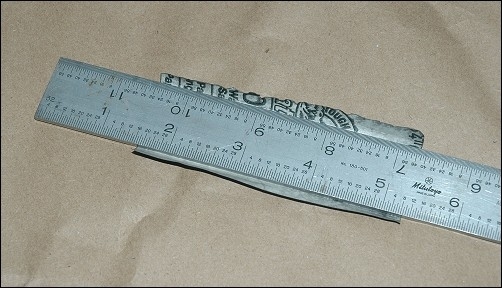 For the nick in the journal shown earlier, I chose a short piece of 1000 grit wrapped around an ultra flat steel rule to remove any raised burrs caused by the nick. I didn't concentrate on one spot with the paper wrapped ruler. Instead, I swept the paper wrapped ruler over about 90 degrees of the journal surface - kinda like block-sanding filler on a body panel. Just remove the peaks of any burr, not the valley. Once deburred, I polished the remainder of the journal using a longer piece of 1000 grit wet/dry sandpaper, liberal application of WD-40 and multiple "shoe shine" strokes - without the ruler, while working my way around the journal. As the previous photo of the crankshaft journal shows, I was able to deburr the nick, while leaving the remainder of the journal virtually untouched. The crosshatching on the journal that you see in the photo was there originally, showing how crankshaft journals look from the factory. My polishing of the journal did not remove the factory crosshatching. After watching a series of Youtube videos showing engine machine shops and their use of equipment for polishing crankshaft journals I find it hard to recommend having a crankshaft polished using a machine polisher. Essentially, a machine polisher, as used by an engine machine shop, is a large belt sander equipped with a narrow (main bearing width) 400 grit belt. The dry belt rides the journal as the crankshaft is being turned in a lathe. The light touch and skill of the operator affects the quality of the finish. As such... it appears to me that there is considerable opportunity to remove too much material and/or produce an out-of-round journal. Do a search at Youtube.com for the keywords "crankshaft polishing" to see for yourself. Incidentally, most of the home-brewed methods seen on Youtube are pretty scary too. Hand polishing using ultra-fine wet/dry sandpaper and WD-40 presents very little risk to the journals. Because of the weight (shipping cost) and how easy it is to damage a crankshaft, I found getting a good one exceedingly difficult. What is a good-used crankshaft and what is one worth? A good-used crankshaft is one that is free from rust spots, and free from dings, nicks or any sort of damage to any journal or seal surface that would require a re-grind. A simple hand polish should be enough to return it to service. A good used crankshaft is worth about $200-$300, while a brand new 6.5L GM/AMG nodular iron crankshaft will cost you more than $900. It took me more than 2 years to locate a good used crankshaft. Protecting what you have, either for your own use or for resale, is definitely worth the effort. As it turns out, these crankshaft journals can be easily damaged by metal-to-metal contact/impact. Simply laying an unwrapped crankshaft on another metal object(s) can produce nicks or scrapes on the journals. That is why it's so important to know with certainty how to handle a rather delicate crankshaft. An upcoming article will show how to correctly disassemble one of these engines, and preserve the crankshaft for long-term storage. If handled correctly, most crankshafts can be returned to service with a simple cleaning, but if your engine's crankshaft needs a little light polish work, like that performed here, this article will provide the certainty you need to move forward. Stay tuned as I work my way through this engine project. I'm sure there will be more questions that require answers having certainty. The Diesel Page, October 2017 What's New: | Feature Articles: | Product Reviews: | Member's Area: Join Us: | Duramax Diesel Page: | Advertisers: | Classified Ads: | Books:
Send e-mail to: turbo@TheDieselPage.com |

