Rear Disc Brake Upgrade for the Early GM Diesel Trucks
By Lee Swanger
I still remember the first vehicle I drove with four-wheel disc brakes: a 1984 Lincoln Continental Mark VII that I rented in 1984 in Charlotte for work at the Catawba Nuclear Power Plant. Compared to the drum/drum and disc/drum combinations on vehicles up to that time, that big Lincoln was a fine ride for the hills of western North Carolina. No grabbing, no fading, and a perfectly linear relationship between how hard I pushed on the pedal and how quickly the Lincoln shed its velocity.
Now, well into the 21st Century, four-wheel disc brakes are taken for granted; both of my other vehicles came equipped that way from the factory. But my trusty 1984 C-10 diesel was in need of some braking improvements to keep up with the Swanger-Avant-Aspirated, nitrous oxide assisted 6.5L diesel that now purrs (and sometimes roars) under the hood. The first choice, an upgrade to newer General Motors parts, was not going to pan out since even with the heavy diesel engine, my old Chevy truck had the 5-lug pattern axle flanges and wheels. So it was off to the aftermarket to research the options.
It did not take long to discover that the consensus pointed to one choice - Stainless Steel Brakes. This company is well known for its various upgrade kits. But the brakes are not really made out of stainless steel. The name came from an early product - stainless steel sleeves in early disc brake calipers that had a habit of rusting up internally and binding the pistons to the point that the disc brakes would not work. SSB, as they are known, has a kit for my exact application, and any other GMC or Chevrolet that uses the venerable 10-bolt axle with the 5 on 5" lug pattern. The SSB A126-1 kit includes new rotors, new calipers with parking brake, brake pads, and the adaptors, brackets and hydraulic plumbing necessary to make it all work, as shown in Figure 1.
Figure 1: Stainless Steel Brake kit A126-1 for the 10-bolt GM Corporate Axles with 5-bolt axle flanges. With the new kit in hand, fresh from Summit Racing Equipment, it was time to put Ol' Red on the lift (Figure 2) to get the process under way.
Figure 2: '84 Chevy C-10 on the lift, wheels off, ready to strip off the old drum brakes. Before beginning, I soaked all the fasteners with PB Blaster to allow them to let go after holding on for over 20 years.
Figure 3: Original hardware shown here soaking prior to stripping off the old shoes, return springs, and wheel cylinders.
Figure 4: Old brake shoes and hardware. Figure 5: Old brakes and hardware GONE!
The backing plate was the next to go, but for this, the axle needed to be moved out of the way.
Figure 6: After draining the axle lube, and removing the rear cover, I removed the locking bolt (blue arrow) so that I could pull the cross pin (yellow arrow) and push the axles in far enough to remove the C-clips.
Figure 7: Stand clear! Axle coming out!
Figure 8: Hydraulic line support (yellow arrow) welded to axle housing.
At this point, my first modification to the SSB package was added. The kit instructions would have the flexible hose from the axle-mounted hard brake line just dangling from the hard line on its way to the caliper. I fabricated some brackets (yellow arrow) to attach the inboard end of the flex line securely to the axle housing, and welded them on (hoping the residual axle lube would not catch fire at the same time!)
The rectangular plate that GM put on the end of the axle housing (blue arrow in Figure 8) is used by the SSB kit for attaching all the new fixed hardware that will position the new calipers. The hardware gets bolted on with the included Grade 8 fasteners, and then the axles shafts are reinstalled.
Now the rotors can go on, and then the calipers can be slipped over the rotors and bolted up to the brackets as shown in Figure 11.
Figure 11: Trial fitment of rotor and caliper. If I had been using stock GM steel wheels, I would have been nearly finished. But, the top hat section of the new rotors (blue arrow in Figure 11) is thicker than the corresponding portion of the old brake drums I had removed earlier. My Weld forged aluminum wheels have a much thicker spider, which made the original GM studs too short. So, after a detour to the main NAPA store in Miami, where I learned there were no longer direct replacement studs, I bought some that I thought I could modify, chucked them in the lathe to turn them down a few thousandths, and pressed them into the axle flanges.
Figure 12: Hydraulic brake lines connected between axle and caliper. The silver arrow points to the steel brake line, red arrow points to flex hose. In Figure 12 you can see how the bracket I added to the axle housing supports the connection between the hard line on the left and the black flex hose that goes to the caliper. Because the calipers are of the floating design, they need a flexible connection between the axle and the caliper.
The calipers that SSB provides in this kit are not some obscure component. They are the rear wheel calipers that Ford provided on the Thunderbird SuperCoupe in 1989-92, and on 5.0L Mustangs in 1987-93, so replacement brake pads are as close as your nearest auto parts store. These calipers also feature a parking brake function via coarse threaded rods that advance the internal pistons mechanically, pressing the brake pads against the rotors when the parking brake cable is tensioned. The parking brake cables that were unhooked from the brake shoes during the demolition of the drum brake system will clip right into the mechanical parking brake levers on the new calipers.
Figure 13: If you look closely in Figure 13, with the wheel and tire reinstalled, you can see that "Yes, there are rear disc brakes on that old truck."
The instructions from Stainless Steel Brakes tell the installer how to adjust the hydraulic system to balance the braking effort front-to-back to compensate for the different properties of the disc brakes that replace the previous drum brakes. This involves partially disassembling the proportioning valve that is mounted to the front chassis cross-member ahead of and below the engine. But twenty-plus years of intimate contact and a touch of galvanic corrosion guaranteed that the brake lines were not coming off, and the proportioning valve was not coming apart. After using all the chemical and thermal tricks to disassemble this, I gave in and contacted In-Line Tubes for a replacement set of hard lines and a new proportioning valve already modified for use with replacement rear disc brakes. It seems I am not the only installer who has found that GM did not intend for me to disassemble the brake hydraulic system after twenty years have elapsed.
So what did I gain? Much better braking feel, for one thing. The brake pedal is higher and firmer, due to less travel of the brake linings to contact the friction surface. And now my truck has that wonderful linear feel to the brakes that I first encountered in the Mark VII so many years ago (the same year my truck was built, coincidentally).
Figure 14: New disc components weigh 25 pounds. Figure 15: Old drum components weigh 32 pounds.
And I also lost something - about 14 pounds of brake weight. I put the SSB parts for one side of the truck on the scale, and then weighed all the brake drum parts that came off. The difference was seven pounds per side. This may not seem like much, but just think about taking 14 pounds off of the driver by putting him (or her) on a diet, and you will appreciate the weight savings.
This is not a job that you can do in the garage in just one day, or if you encounter the detours I did, in just one weekend. But if you have OEM steel wheels, and are willing to zip-tie the brake lines to your axle housing, this could be a weekend upgrade for your 1982-1987 diesel truck, Suburban, or Blazer that provides a big payback in braking efficiency. The Stainless Steel Brakes website (www.ssbrakes.com) includes a useful "VEHICLE PRODUCT SELECTOR" at the top of the main page that will help you locate the correct disc brake upgrade kit for your vehicle. In addiiton, The Diesel Page recommends that you contact SSB directly, and allow them to help you select the correct kit for your truck. TDP
Feel free to contact me (CleviteKid) via The Diesel Page Bulletin Board Forum if you have any remaining questions about this disc brake upgrade.
About the Author:
Dr. Lee Swanger is a consulting engineer trained in mechanical engineering and metallurgy. Currently he is a principal engineer with a major engineering consulting firm, and a significant part of his work deals with large diesel engines in stationary power and marine propulsion.
Prior to his current position, Lee was Director of Research and Development for Clevite Bearing Company, and received his engineering degrees from Case Institute of Technology in Cleveland, Ohio and Stanford University in Palo Alto, California. Lee is a Registered Professional Engineer in Ohio, California, Virginia and Florida.
The opinions that Dr. Swanger expresses in this review are his alone, and may not be attributed to his past or present employers, product manufacturers, or to "The Diesel Page." Each reader must decide for himself if the modifications and recommendations described herein are suitable for his situation. Neither Dr. Swanger nor The Diesel Page can be responsible for the consequences of following any of the opinions expressed herein.


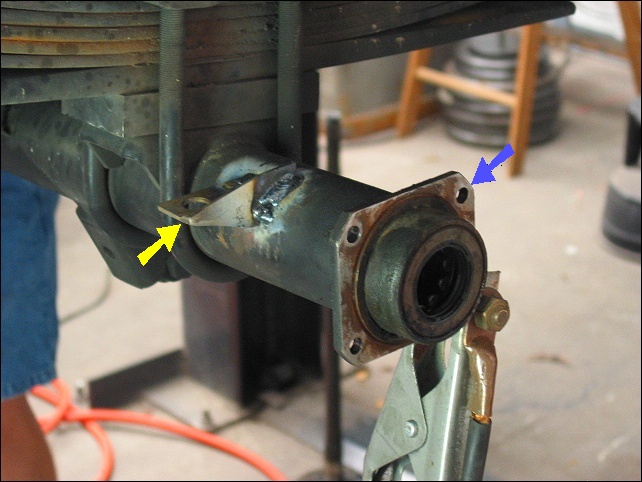


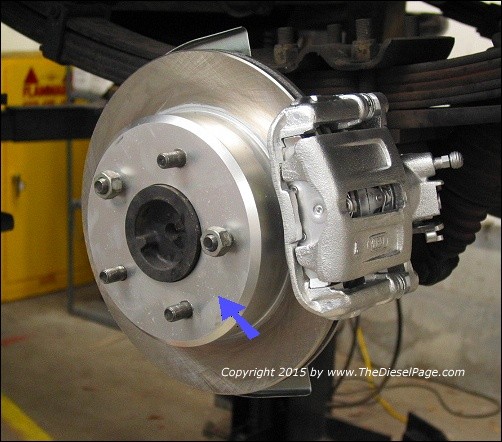


 Figure 14: New disc components weigh 25 pounds. Figure 15: Old drum components weigh 32 pounds.